X
Originally, the reversible film
WHAT IS A SLIDE ? HOW DOES IT WORK ? LEARN ALL THE SPECIFICITIES OF SHOOTING ONTO A SLIDE TO THE POWER OF COVER-SLIDES. The slide - based on the use of a reversible film - is the photographic method dedicated to projection. It allows the realization of transparent positive pictures of extreme quality, very much appreciated by amateurs until the 2000s. Today, a new horizon opens through mobile analog projection.History
The first certificate of the reversible film was filed by Kodak in 1915. It took until 1935 to see its introduction in the cinema as a 16mm film and a year later in 35mm. From this moment on, it has also been used by photographers. The reversible film - especially the Kodachrome and Agfa film - takes off in the 50s, thanks its use by amateurs and its use in projected form. The film provides excellent quality in terms of color, contrast and durability. Because of these qualities, it is equally appreciated by professional photojournalists, fashion photographers, as well as for archiving. Billions of photographs on slides were taken during the second half of the twentieth century, but the advent of digital photography in the 2000s put a stop to its success. Nevertheless, despite the replacement of the film by the digital, no digital projector can yet compete with the quality of the slide projection.HOW DOES IT WORK ?
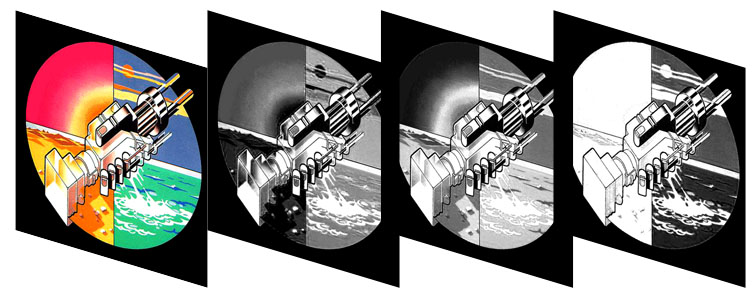
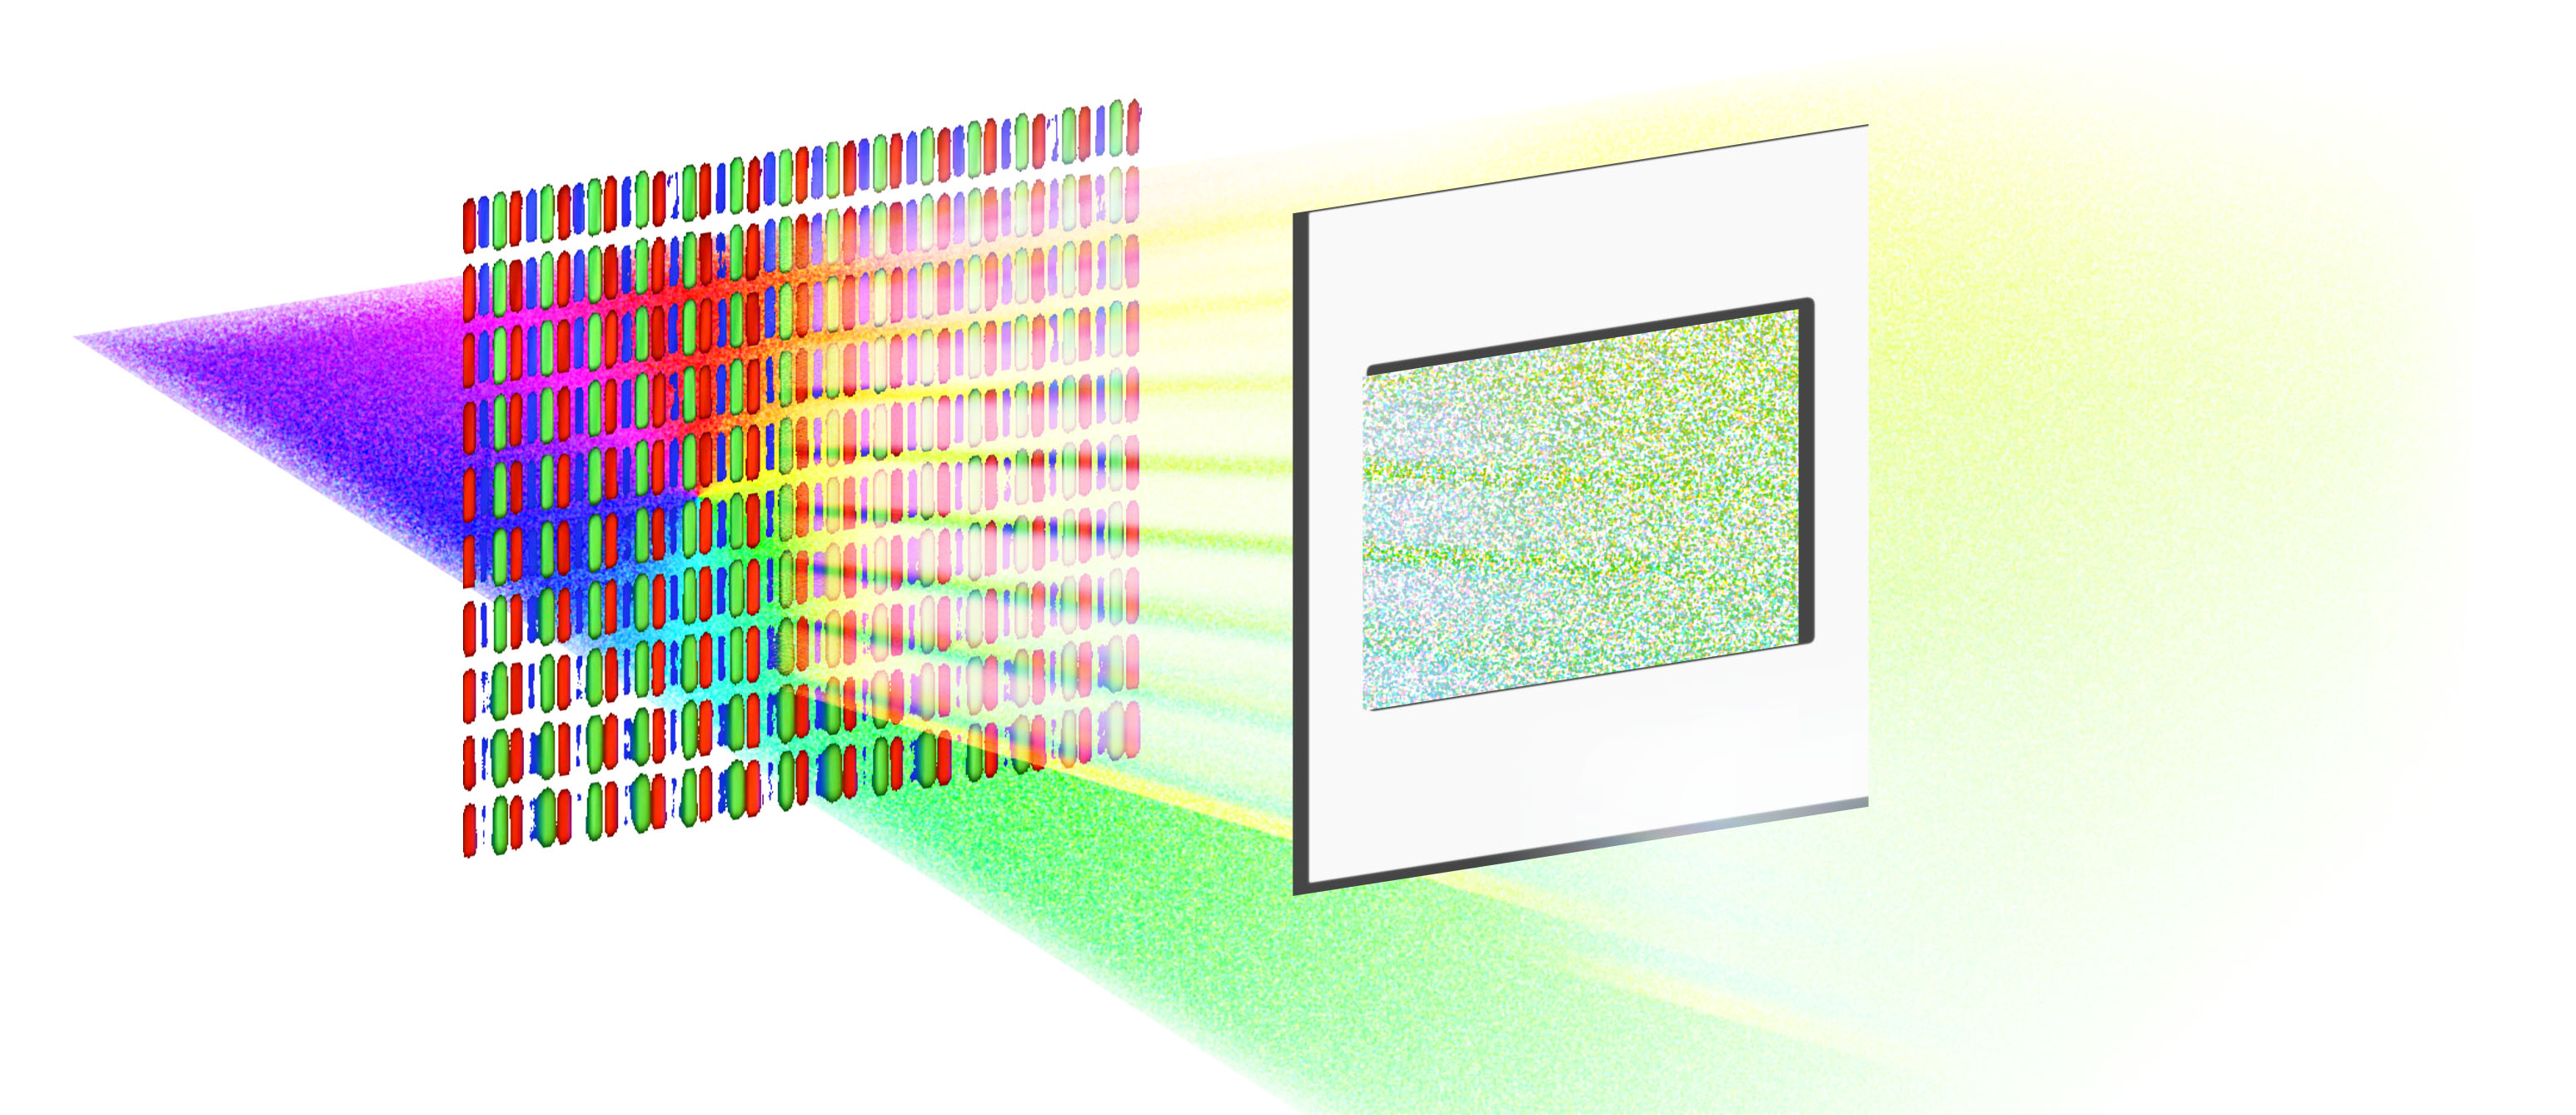
The slide rests on the use of a reversible film or "ekta", the emulsion of which (light-sensitive chemical layer) reproduces the colors positively. Opposively to the negative turning parts of the film exposed to light into dark shapes, the reversible film transforms light parts (whites) into transparency. The transparent positive image is directly viewable and projectable. As for all films, it is composed of a flexible support smeared with a photosensitive emulsion in which are situated the light-sensitive crystals . It is these crystals that undergo chemical change following their exposure to light. To create the color of the film, the photosensitive crystals are attached to a specific dye chemical to generate color. The emulsion is made of a sandwich of three different layers of crystals sensitive to the 3 complementary colors : blue, green and red. The blue-sensitive crystals produce a yellow dye, the green-sensitive crystals produce a magenta dye and the red-sensitive crystals produce cyan dyes.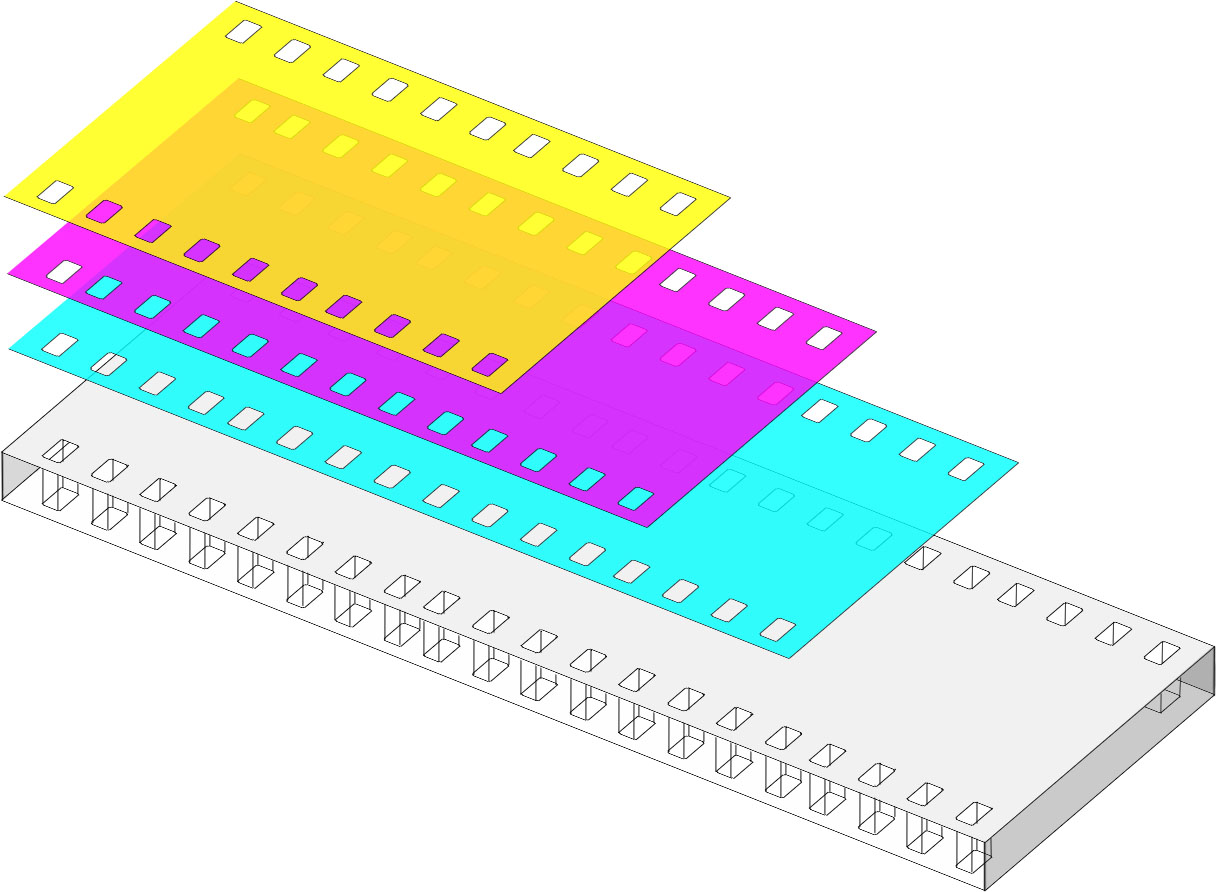
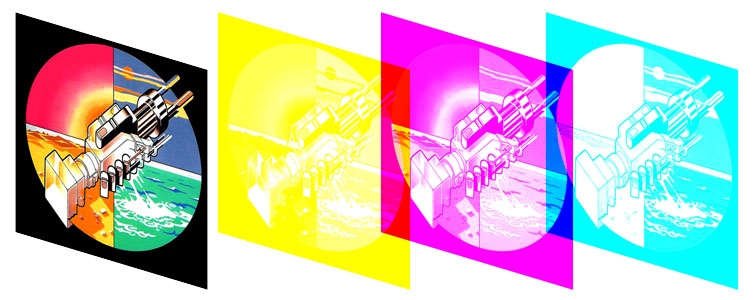
Superposition of cyan, magenta and yellow dye layers
The layering can reconstruct all the visible colors by subtractive synthesis.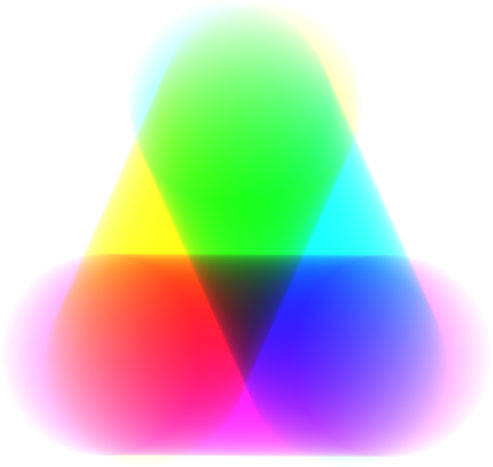
Recovering of yellow, magenta and cyan beams
After exposure to light, the film must be treated in a chemical chain. These reactions are necessary for the development of the picture in a positive form.CHEMICAL TREATMENT
Chemical Process E-6 is formed from four major chemical baths, all of which act on the crystals to materialize the image.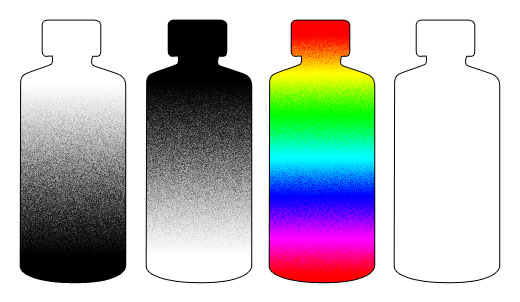
4 baths of the E-6 Process.
1. 1st B&W developing bath: The film is immersed in a black and white negative developer which darkens the exposed crystals. Each layer reacts and a black and white negative picture is obtained. The crystals are certainly blackened but the color dyes are not activated. 2. Reversal Bath: As if we exposed the film again to light, this bath only acts on unprocessed crystals. Unexposed crystals during the shooting are now exposed, without being developed.
 3. Color Developer: It develops crystals that responded to the reversal bath. The color developer will show the dyes that are attached to the crystals.
 4. Bleaching: It destroys the crystal blackened by the first two baths without affecting the color dyes. The remaining result is a colorful and positive image. After rinsing and drying, the film is ready for use.
WHERE TO DEVELOP ?
Reversal films are treated in photographic laboratories offering a so-called E-6 processing chain. Deadlines vary by place of treatment: within the day when the processing is done locally or several days if it is just collected and sent elsewhere. On this map you will find the laboratories offering this service.Map of E-6 laboratories
Click here to add a laboratory
For further documentation of the process and its use: where to buy movies online ? Where do develop remotely ? What devices are still produced ?...Hand Treatment
It is also possible to perform this treatment by hand. Hand development kits still exist: TETENAL Colortec E6, ARISTA Rapid E6. The treatment is carried out at a constant temperature of 40°C.
Kit Tetenal E-6
Hand treatment
PHOTOGRAPH BY SLIDE
Unlike negative film that are only a first step in saving the image, slide films must altogether register and reveal the image with the right colors. Therefore, we have to think ahead during the shooting how we want to restore colors values.SLIDE SPECIFICITIES.
For a satisfactory rendering of the picture, slide films have a higher contrast than negative films. This results in limiting their ability to return significant brightness differences. For a true rendering of one's perception, one must imagine while shooting how the different subjects will be shown. It has to be decided and acted upon right at the beginning because no other manipulation will be applied retrospectively.TAKING PICTURES FOR PROJECTION.
In photoprojection, it is recommended that a slight overexposure of 0.5 diaph to 1 diaph for the following reasons :- - The clearer film, the more transparent, the more it increases the brightness of the projection.
- - Overexposed slides present higher contrast and higher saturation, making it easier for appreciation.
- - Clearer, the film absorbs less light, reducing its heating and improving its lifetime.
- - Heating causes a deformation of the film that generates blurry areas in the projection. This problem may however disappear through the use of cover-slides with glass covers.
- - Overexposure defects that can cause a loss of detail in highlights are often compensated by the texture of the projection surface.
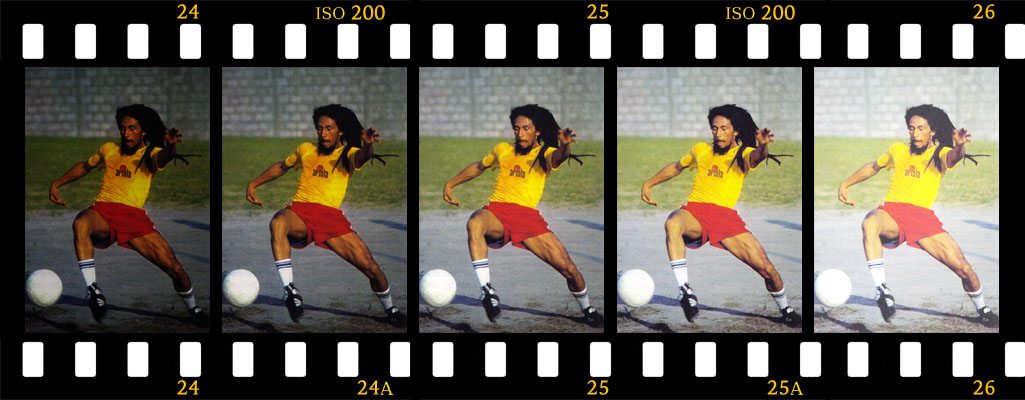
Exposed image with differences 1/2 diaph
HOW TO MEASURE THE LIGHT ?
In slide-making, you must first think about the film exposure regarding the consequences that will occur in the image. To properly expose your image, one must ask the following question: what is the main topic I want to highlight ? What are its visual characteristics and how is it lit ? The first answer indicates on what you will make the measurement of light and the second, how you will interpretate this result to correct the given measure.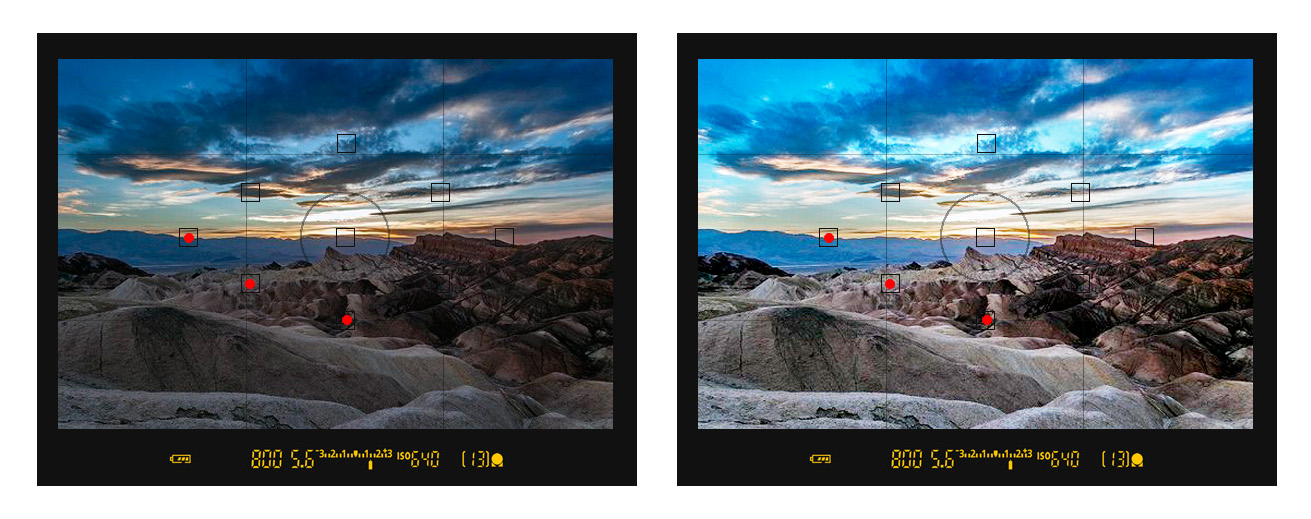
Normal exposure / exposure compensation + 2/3 diaph
First, to expose a reversible film, it is recommended to use the spot metering of your camera, so as to perform measurements to specific areas. Here is a simple method to correctly expose your film.- 1. Make a spot measurement on the main subject without including your light source measurement (sky or artificial lighting) because they strongly influence the measurements of your device.
- 2. Assess whether your subject is particularly black, white or neutral. If it is black, compensate the measurement result with -1.5 diaph and +1.5 diaph if it is white. In this way, a black subject will be well represented in black and vice-versa for a white subject. For very dark or bright subjects, compensate the exposure accordingly within these two limits.
- 3. Is your subject lit differently throughout your picture ? It is indeed necessary to consider the subject in its environment and be attentive to the overall rendering of the picture. If the rest of the picture is visibly brighter, compensate -1 diaph to preserve detail in the rest of the picture and vice-versa if the picture is darker.
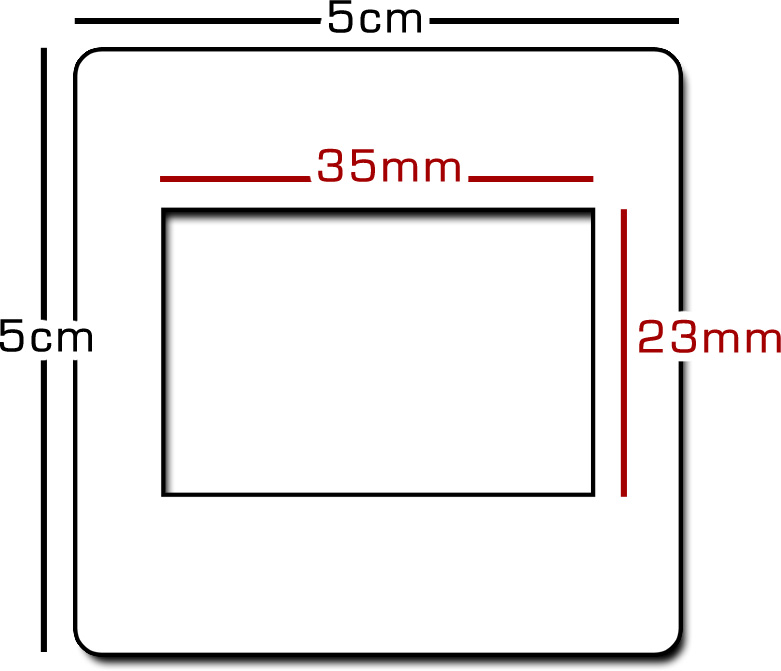
Cove-slide 24x36mm
 A developed reversible film needs to be put under cover-slide to be projected. Their function is to keep the film in a rigid plan that stops the light and allow its installation in the projection devices. For pictures on 35mm film, slides cover with a measuring 50x50mm 23x35mm window (meaning 1 mm side within the window of the film) and a thickness ranging from 1.8mm to 3mm. They consist of two separable parts, with possibly two glass parts to ensure a perfect flatness film even under heating.
Cache slide 24x36mm
WHICH SLIDE COVERS ?
Passing through the film, a portion of the light is absorbed and converted into heat. This causes heating and possibly deformation of the film. This deformation causes uneven sharpness on the projection. Particularly dark and therefore highly absorbent images are more prone to this phenomenon. In this particular case, it is preferable to use slides with glass covers, but under normal conditions glass covers are not recommended because they cause a drop in brightness and contrast due to the reflections that the glass produces.HOW TO MOUNT SLIDES ?
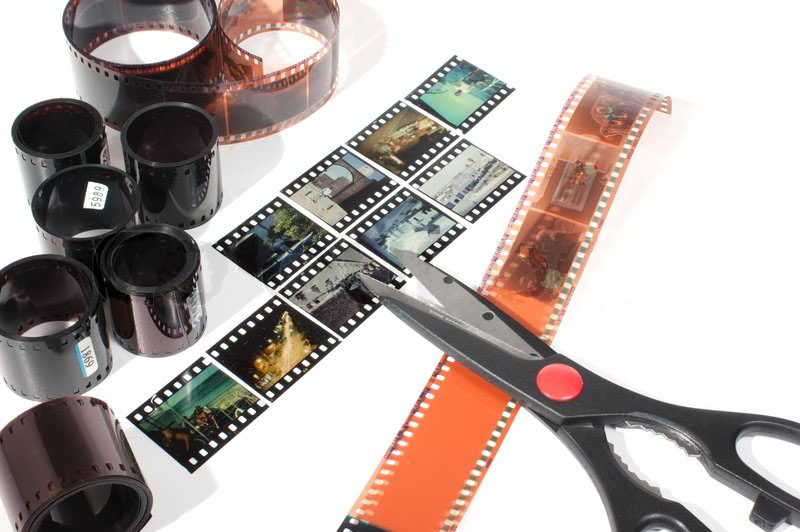
As we have seen, the films are made of a surface smeared with photosensitive emulsion which constitutes the image. Observing a film, you can read the inscriptions of the manufacturer near the perforations; frame number, films ... If you are able to read the inscriptions in the right direction, it means that the image layer is towards you.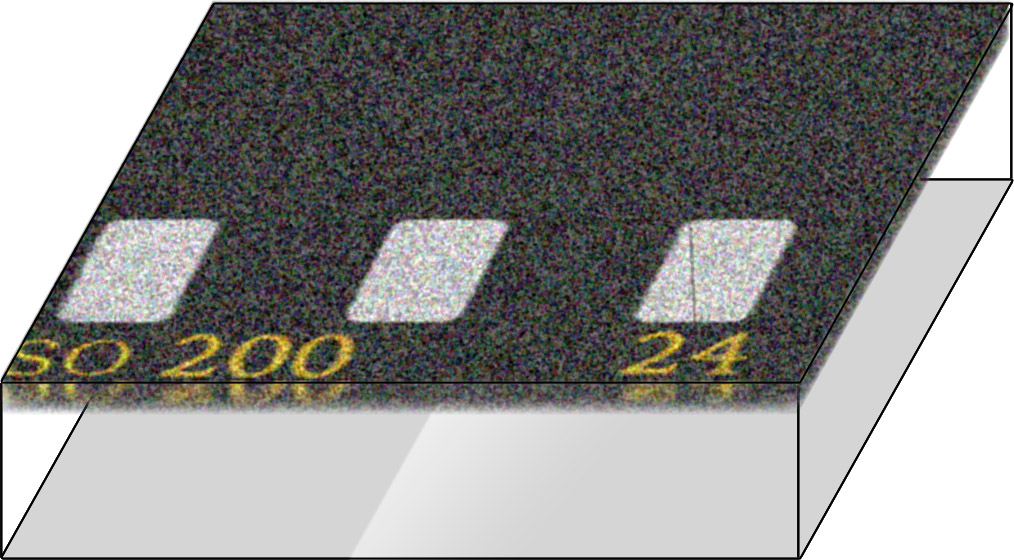
Portion of a photographic film
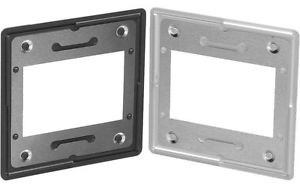
In the projector, this layer must be on the side of the lens; in this way, the support side is facing the lamp. Similarly, cover-slides have two sides of different colors. The white side must be on the side of the lamp, near the the light, and the gray one on the lens side. Thus, to properly mount your film in the cover, the gray side must be facing you and the cut film so as to be able to read its inscriptions in the right direction. Remove the film on the gray side and close using the white side. Be sure to press both sides together to allow an easy insertion of the slide in the ring.WHERE TO FIND SLIDES MOUNTS ?
The major manufacturers are GEPE or CS. GEPE sells online their various covers on ECCE, otherwise it is possible to find some easily on EBAY or AMAZON.X
X
THERE ARE 3 TECHNIcS TO TRANSFER A DIGITAL PICTURE ONTO A TRANSPARENT SURFACE: FILM RECORDING, PRINTING, AND SCREEN SHOOTING. WE RECOMMEND THE FILM RECORDING TECHNIQUE FOR HIGH DEFINITION PICTURES. PRINT AND SCREEN SHOOTING ARE MOSTLY USEFUL FOR BATCHES OF PICTURES WICH DON'T REQUEST A HIGH LEVEL OF DETAIL
 The pictures are transferred to a 35mm film, which requires the use of a picture at the same 2/3 ratio. For pictures of another ratio (square, panoramic), they will be manipulated to fit the 2/3 format of the slide.
How to ?
Here is our list of laboratories offering online services. For Europeans, we recommend the Digitalslide laboratory. The service is fast, effective and of great quality.
The pictures are transferred to a 35mm film, which requires the use of a picture at the same 2/3 ratio. For pictures of another ratio (square, panoramic), they will be manipulated to fit the 2/3 format of the slide.
How to ?
Here is our list of laboratories offering online services. For Europeans, we recommend the Digitalslide laboratory. The service is fast, effective and of great quality.
| FILM RECORDING | PRINTING | SCREEN SHOT | |
| Quality | 4k | Low definition | 2K |
| Delivery time | 1 week | 1h | 1-4d |
| Price per view | 4€ | 10ct | 60ct |
| Technical elvel | Beginner | Beginner | Expert |
Film recording
Film recording consists in projecting the picture in high definition - 4K (4096x2732, sometimes 8K 8192x5462) - on a slide film using a film recorder. The service is offered online by some photographic laboratories. The film is then developed in a E-6 chemical processing chain like a normal slide, and then placed under a slide mount. The process ensures maximum picture quality with a very high resolution and a photographic grain of extreme delicacy. The picture shows a perfect contrast and natural colors, thanks to the slide film dyes.
The pictures are transferred to a 35mm film, which requires the use of a picture at the same 2/3 ratio. For pictures of another ratio (square, panoramic), they will be manipulated to fit the 2/3 format of the slide.
How to ?
Here is our list of laboratories offering online services. For Europeans, we recommend the Digitalslide laboratory. The service is fast, effective and of great quality.
EU
http://www.digitalslides.co.uk (UK)
US
http://www.colorslide.com (US, FL)
https://www.gammatech.com (US, NM)
http://www.exslides.com (US,OH)
http://www.slidesfromdigital.com (CA, US)
FR
X
X
Printing
This method dedicated to low definition pictures consists in printing on a transparent surface by using a digital printer. Printed pictures will make a very visible print fame appear giving a "street" side to the picture. However, this technique has the advantage to enable the transfer of pictures to any ratio or form on the transparent surface: square, panoramic, circular. All you need to do is print your pictures in a black 5cm x 5cm square on transparent film and then cut the square. The size of the pictures depends on their ratio to optimize the performance of the projector.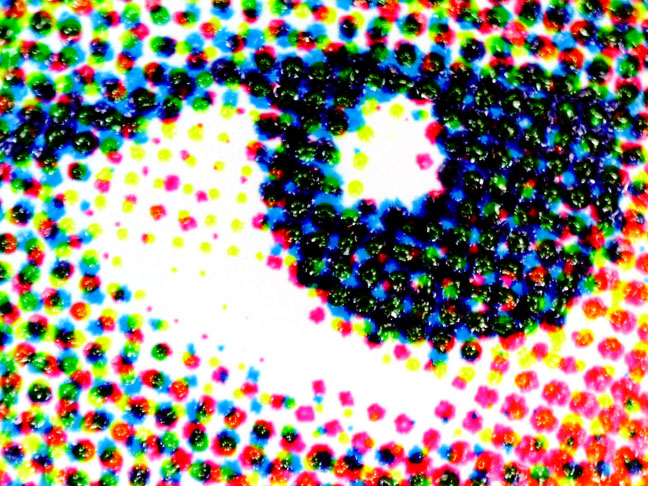 How to proceed ?
If the image is the 2/3 ratio :
How to proceed ?
If the image is the 2/3 ratio :
- 1. Print the picture at a 24x36mm format on transparent paper.
- 2. Cut a 5cmx5cm window around the image.
- 3. Place the picture in the slide cover.
X
X
Screen shooting
This DIY technic consists in photographing a digital screen with a film camera. It produces HD quality pictures at a relatively low cost and requires a film camera. In this way, the screen picture is projected on the slide film, thus receiving the picture of the screen. The slide film must then be processed in a photo lab. The image quality depends completely on the definition of the screen.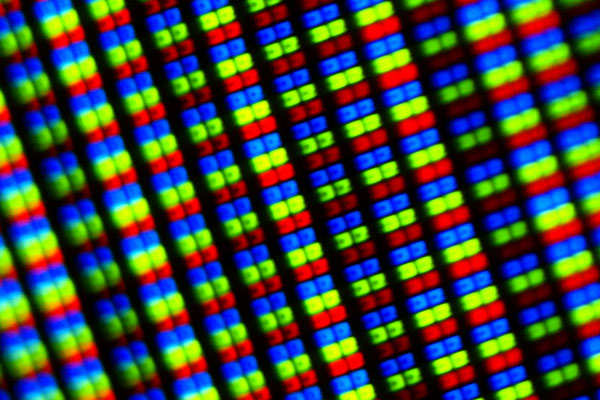 How to proceed ?
Condition: This must be done in a place protected from daylight.
Equipment :
How to proceed ?
Condition: This must be done in a place protected from daylight.
Equipment :
- – Computer ;
- – Silver 35 camera with a manual exposure mode ;
- – Recommended 50mm focal length ;
- – Slide film ;
- – Tripod.
Method :
- 1. Open pictures in a viewer like Outlook for Mac or Windows and photos on a full screen mode with a black background.
- 2. Load the camera's film.
- 3. Apply the following setting :
- – Fixed permanent exhibition +2/3 I.L.
- – Self Timer 2sec
- – Manual exposure
- – Manual focus.
- – Select an intermediate focal length when using a zoom
- 4. Place the camera on the tripod, facing the screen, horizontally and at half height.
- 5. Show on the screen a horizontal 2/3 ratio image, neither particularly dark nor bright.
- 6. Look through the viewfinder to focus and adjust the distance of the camera to the screen to have a full picture in the viewfinder.
- 7. Immerse the room in darkness.
- 8. Conduct a measure of light, and choose a shutter time setting to work an opening F: 8.
- 9. View the first image, move the pointer in the right corner of the screen. In the case it is a vertical image, rotate 90 °, as to display it in the width of the screen. Also, it is recommended to identify the keyboard shortcut to do this easily. Do this for each vertical image.
- 10. Make the first shot and display a new picture on the screen. Continue the method so as to photograph all pictures. If a picture is particularly dark or light, do not hesitate to make a bracketing. All pictures are now displayed on the slide film, bring your film to a laboratory to perform the slide development (E-6 Process), preferably locally to limit delays. Request to have the films put under cover-slide after development.
Prepare your digital pictures
Follow our technical advices to optimize the transfert of your digital pictures on slide:
X
X
DRAWINGS, WRITTINGS, FINGERPRINTS… DISCOVER DIFFERENT WAYS TO CREATE PICTURES READY TO PROJECT.
 About rigid support, slides mounts with glass are a very good option. These mounts are divided into 2 parts with a piece of glass in each part. They were initially made to keep the film flat instead of it warming during projection. This option is very useful because it is perfectly adapted for slide projectors.
 UV ring filters are also interesting, especially for pictures made from black smoke. By leaving a flame under a glass, you obtain a very dark layer of carbon which can by used to make a drawing by contact.
precept
Analog projection works with pictures on a transparent surface, film or glass. It’s possible to create pictures by drawing or writing on these surfaces with opaque markers. These pictures can be instantly projected with an extreme level of detail with the use of photographic lenses. Most of the pictures created by this process are black and white but colored pictures can also be made with transparent inks.supports
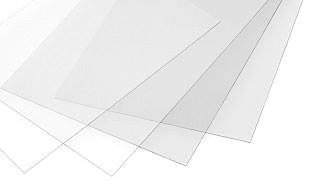
There are 2 kinds of surfaces : flexible (film and transparent sheets) or rigid (glass). Transparent sheets for printers are the best option in term of transparency, price and flexibility.gap height="40px"]
About rigid support, slides mounts with glass are a very good option. These mounts are divided into 2 parts with a piece of glass in each part. They were initially made to keep the film flat instead of it warming during projection. This option is very useful because it is perfectly adapted for slide projectors.
UV ring filters are also interesting, especially for pictures made from black smoke. By leaving a flame under a glass, you obtain a very dark layer of carbon which can by used to make a drawing by contact.
HOW TO DO ?
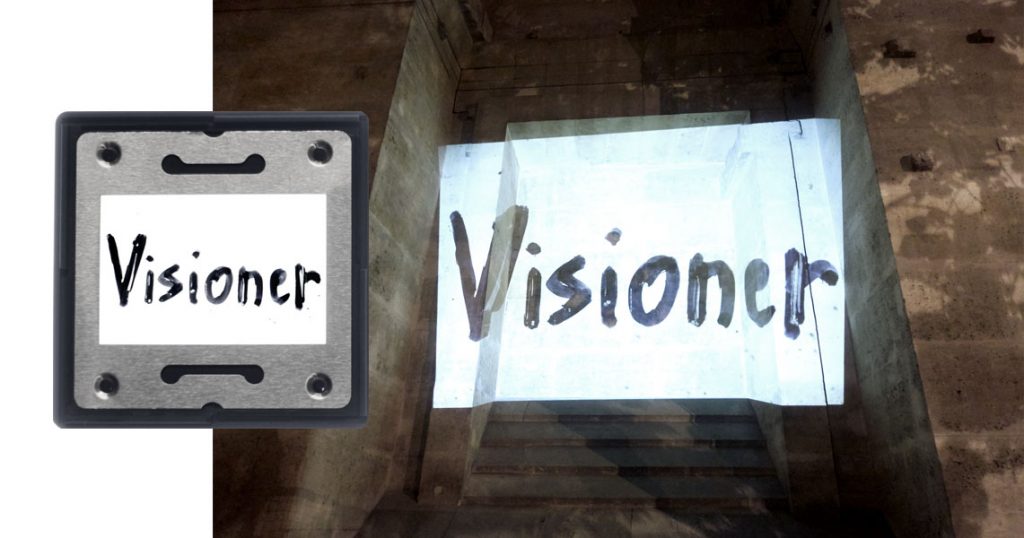
In this example, we’re using a POSCA black marker on a slide mount with glass. There are 2 ways to make a picture, the first one consist to draw an opaque drawing on the glass. It creates a projection of a white rectangle where a black drawing is drawn.
Projection of a opaque path on a slide mount with glass
Altough this technique is very easy to do, it doesn't use the specificities of projection because it would be better to project this drawing directly with a stream of light. To make this possible, it’s first necessary to darken the surface of the glass by spreading a layer of dark ink all over the surface, and then to engrave the surface in order to create the transparent drawing. The dark layer hides light while the transparent drawing lets the light goes through; thus the drawing seems to be simply made of light.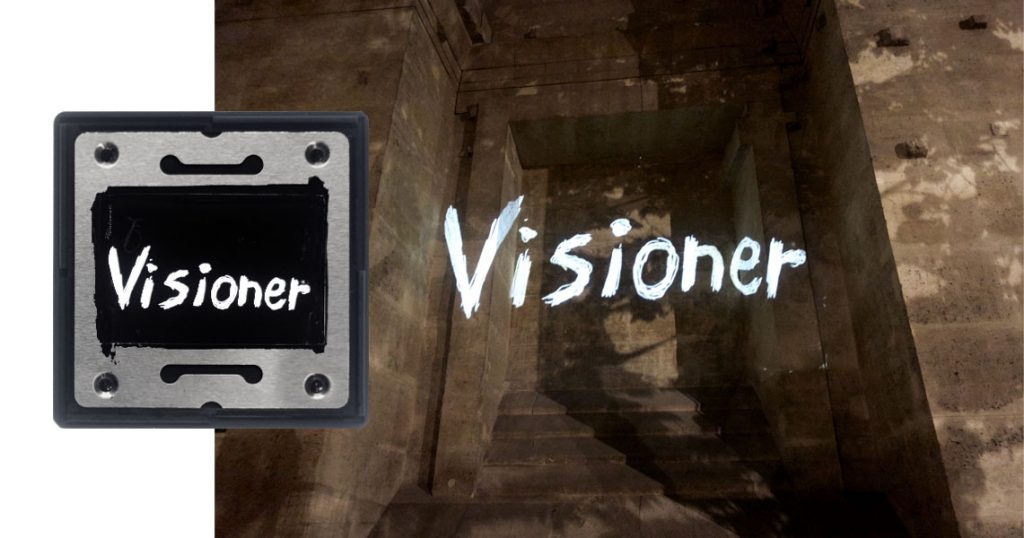
Projection of a drawing by transparency on a slide mount with glass
The drawing tool is also imporant because it defines the width of the drawing line. Different options exist : a needle, a paper pencil, a sharp blade… The larger the tool, the more light will pass trought the glass and the more visible will the projection be. In the following video, you’ll see how to make a fringerprint projection by contact.X