X
WHAT IS PROJECTION? THAT IS THE QUESTION WE'LL ANSWER THROUGH THE DISCOVERY OF OPTICAL PRINCIPLES, THE CIRCUMSTANCES IN WHICH THEY OCCUR AND HOW IT TRANSFORM AN OBJECT TO A PICTURE.
VISIBLE BODIES
A body is visible if sends back light to our eyes. It can issue light like the sun, a candle or a lamp, or reflect it like most of the solid bodies that surround us.The first types of bodies, those emitting light, are called primary sources. They consume energy that they transform into light, while the latter are called secondary because they react to an already existing light. These bodies are more or less opaque or transparent. Opaque bodies reflect more light than they pass through them. Here are some examples : a sheet, a book, our human body, whereas transparent bodies let through that light while changing its characteristics. All bodies are both opaque and transparent at the same time. It reflects the light it receives and allows more or less of it to pass through; no body is completely opaque or completely transparent. If you put a flashlight behind your finger, you will find that it lets some light shine through it, like a sheet of tracing paper, both transparent and diffuse.
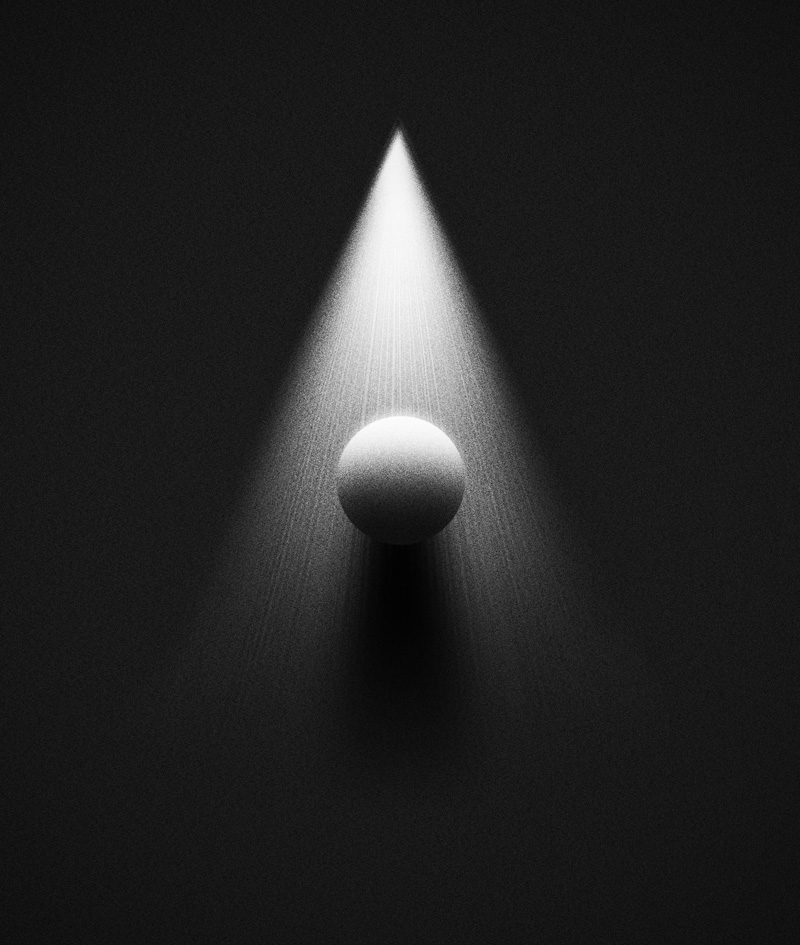
Illumination of a sphere with diffuse source
Rays and objects
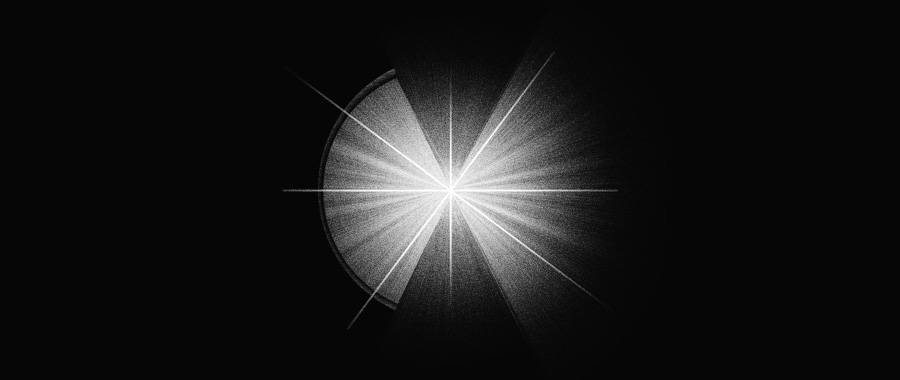
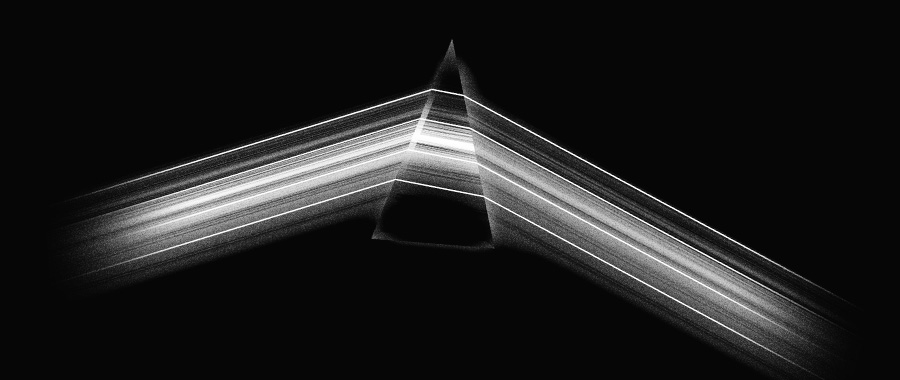
To make the vision of an object occur, our eyes must receive the information of the rays of light, emitted or reflected by this object. The daily experience of vision is made of mainly opaque objects reflecting light, rather than the sources themselves. The sources illuminate certain sides of objects by generating shadows on themselves, on the side that is not illuminated, and on surrounding objects. The shadows of the object itself helps to understand its volume through the passages from light to dark. The shadows on the surrounding objects help to to locate objects in space and from each other.
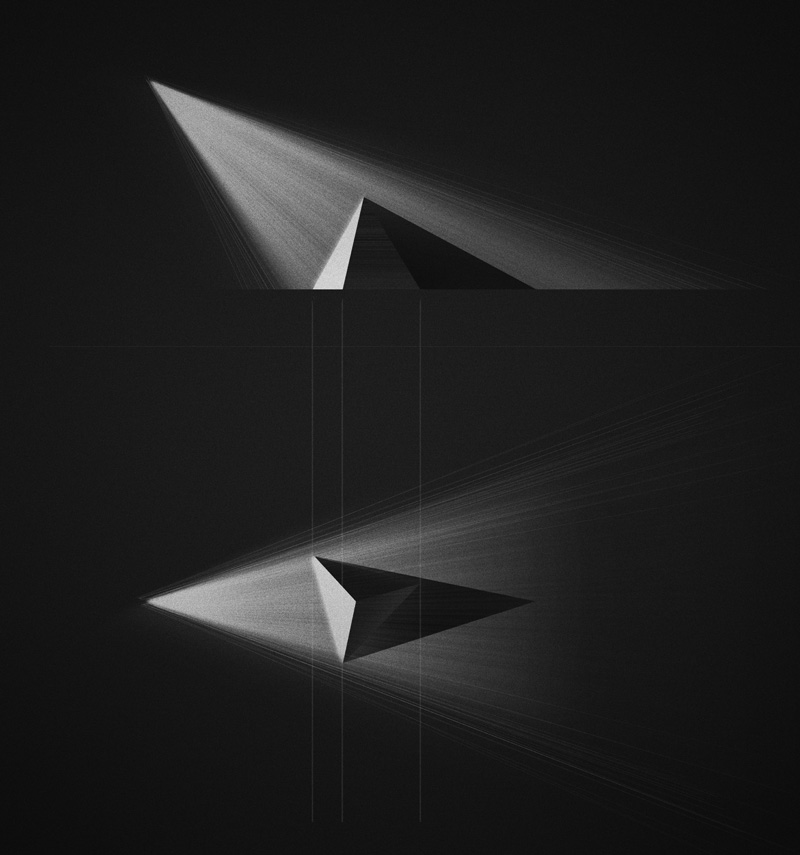
Illumination of a pyramid placed on the ground by a point source
Projected shadows are the projected picture of the illuminated object on other objects by rays of light. This is called a direct projection. If the source is punctual, the projected picture will be sharp. If the source is large, the picture will be diffused. Perspectivist designers of the Renaissance had in heart to describe this direct projection of shadows that generates this feeling of volume in the pictureLUMINOUS FLUX
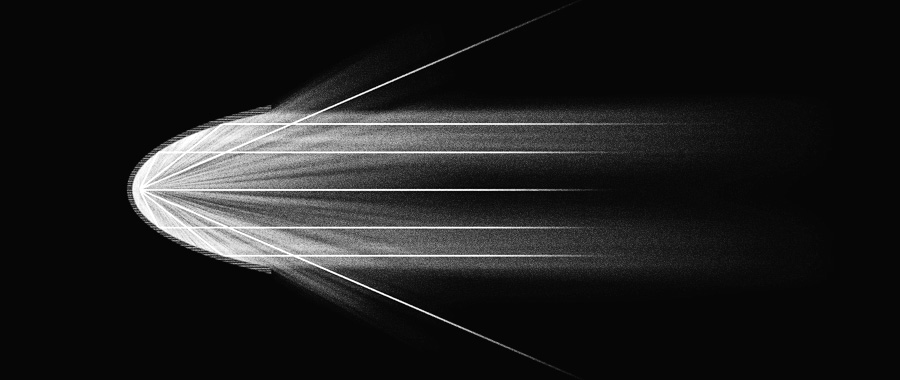
Light travels in a straight line through a transparent medium, and its path is identical regardless of its direction of propagation. That is what we call the principle of inverse return. The trajectory of a ray of light does not depend on its direction. A flux of light can be divergent, convergent or parallel. A light source such as a lamp or a star emits a divergent flow because rays are emitted in all directions from the source. But from our perspective of earthlings, rays of sunlight seem all parallel. It is a question of scale. At a great distance from the source, the rays of a light flux appear parallel. On the other hand, a convergent flow is a flow that is focused at a precise point, like a magnifying glass focusing sunlight.X
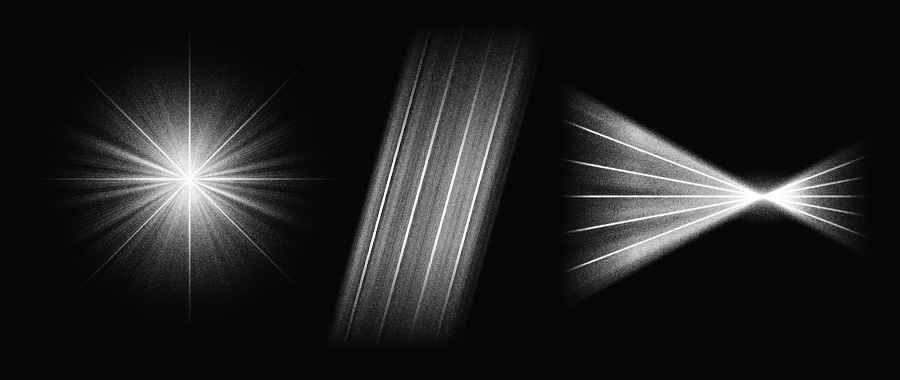
Divergent flux / parallel flux / convergent flux
X
Reflection
Reflection therefore concerns opaque objects that will send back the light they receive. It can be done in two different ways : diffuse or specular. We know that each body is both opaque and transparent. A portion of the received light is reflected and some is transmitted. Let's look in detail the interaction between light and an object to find out the specificities of reflection and transmission.X
Specular reflection // diffuse reflection
X
Diffuse reflection reflects the incident rays in all directions. This then provides the same perception of the object regardless of the point of view. 90% of materials react to light in this way because their surface has asperities.
Specular reflection returns the incident rays with an opposite angle. This results in a different perception of the object in its environment that reflects it. This phenomenon appears on the well-polished surfaces like mirrors that appear differently depending on our perspective.
Mirror
These specular materials will particularly interest us because they generate a special optical phenomenon. Mirrors may be flat or curved, arranging luminous flux in different ways, sometimes parallel or convergent under certain conditions. For example, a spherical mirror is made of a portion of reflective sphere located in the inside of the sphere. If a light source is placed in the center, all the rays that reach the inside are reflected back to where they came from, the source, because they are sent perpendicularly. Rays back on themselves and reconvert at the center point. Thus, part of the flux, initially emitted "diverging" by the lamp, becomes converging.X
Reflection of a light source placed in the center by a spherical mirror
X
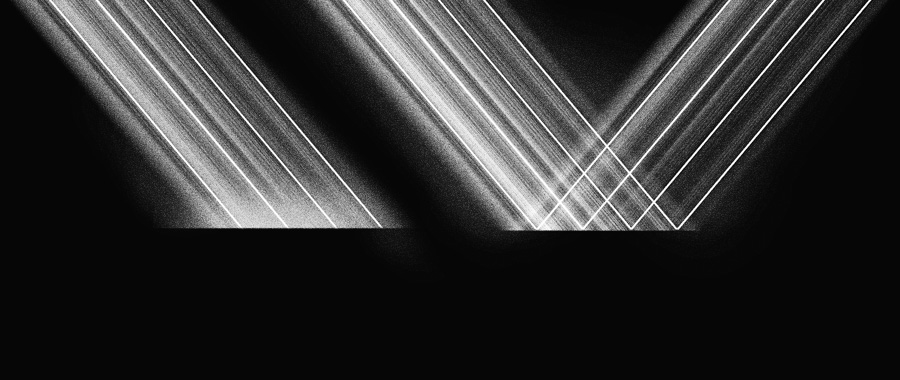
Another example is a parabolic mirror. It consists of a fragment of a mirroring parabola. One of its properties is a center where all the emitted rays are reflected in the same direction.
One can thus generate a parallel flux from a divergent flux. This property is particularly interesting for projection devices that often require to organize a parallel flow.
X
Reflection of a light source by a parabolic mirror
X
Refraction
Refraction relates to transparent objects that let the light they receive pass through them. Same as in the case of reflection, the materials can react in two different ways, directly and diffuselyX
Diffuse Refraction // Perfect refraction
X
The diffuse refraction disperses the rays transmitted in all directions. The phenomenon is present in all materials found in nature.
Perfect refraction - often referred to as simply "refraction" - causes a deviation of the incident rays; the angle of deviation varies depending on the nature of the two environments. We see this phenomenon if the second transparent medium is not diffusing, for example water, glass, silicone, plastic. Some lenses, essential components of projection devices, act as light refractor.
From the above descriptions, we can then represent all the components of reflection and refraction that occur during an interaction between a light flow and an object. Each material will react differently, favoring one of the phenomena, which constitute the material's own visual qualities.
X
Reflections and refractions of the rays in contact with a second medium.
X
PRISMS & LENSES
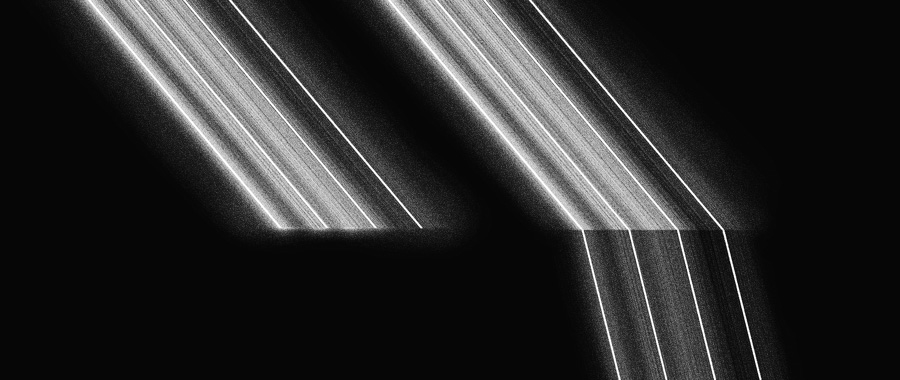
Lenses are made of a transparent material delimited by two curved or flat surfaces. When incident ray meets the surface of the lens, it mainly crosses through the glass and refracts inside the glass. These deflected rays change their orientation a second time when they come out of the glass. Thus, between the inlet and the outlet of the glass, it changes direction twice because it is refracted twice. On the prism below, you can see the two deviations endured by the incident raysX
Double refraction at air-glass and glass-air of light passing through a prism
X
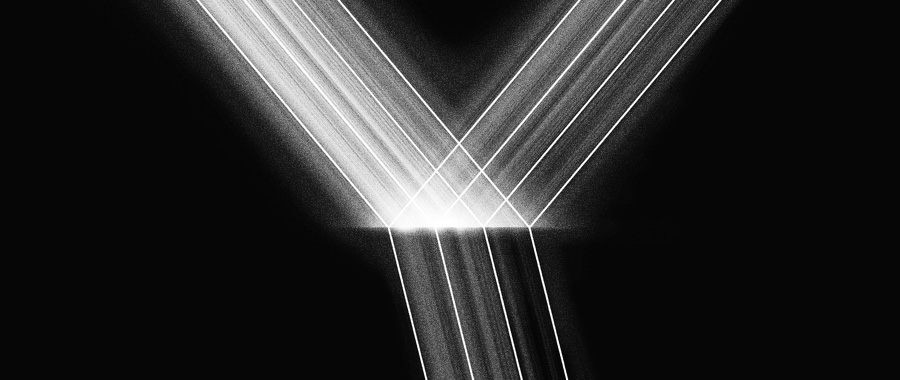
If a ray passes through glass with two parallel sides, it is deflected a first time by passing through glass, and a second time passing out of the surface of the glass. These conditions are those of a ray passing through a window or the middle of a lens, since in its center the two faces of a lens are parallel.
X
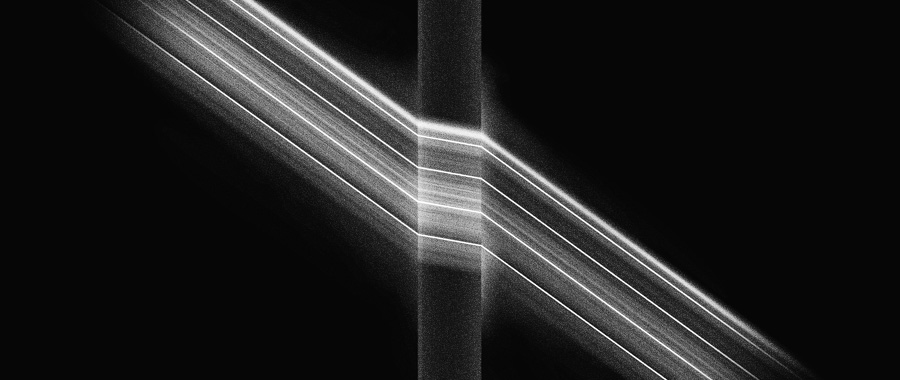
Double refraction with parallel-sided glass
X
There are lenses with convex or concave curves that have the effect of converging or diverging the incident light flux.
Converging lenses have narrower edges than the center. Because of the curving generated and the laws of refraction, it deflects the ray onto its optical axis. A luminous flux arriving in parallel with the optical axis converges to a point called focal point. The distance between the optical center (approximatively the middle of the lens) and the focal point is called the focal length.
X
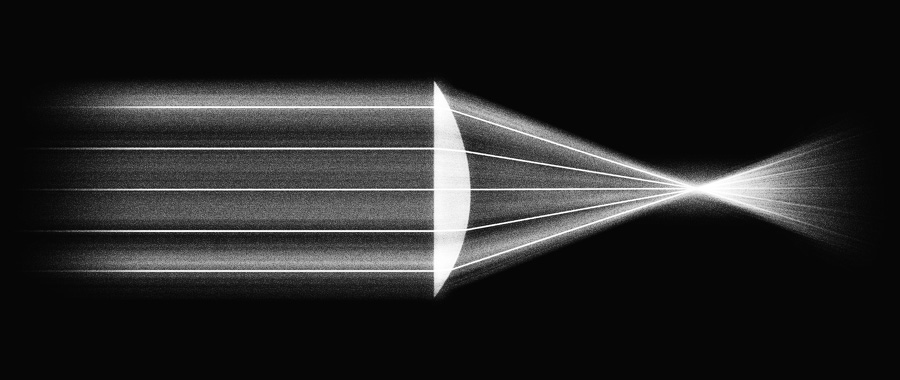
Convergence of rays parallel to the optical axis
X
Divergent lenses have wider edges than the center, which has the effect to diverge rays arriving on them. A luminous flux parallel to the optical axis will be dispersed so as to deviate from the optical axis. This time, the focal point where converge rays of the side they're from is virtual. Unlike the converging lenses, it is a virtual point for determining the beam deflection but which is not actually a place where the light is concentrated.
X
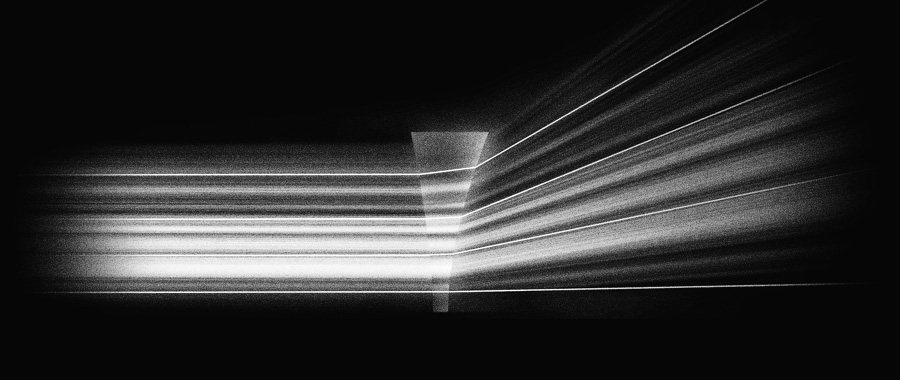
Divergence of rays parallel to the optical axis
X
Conclusion
Reflection and refraction make understand how the light sources and objects can interact with light. By specular or perfect refraction, reflection, mirrors, and lenses show very specific behaviors with light. It is from these characteristics that we will be able to consider the design of projectors. These phenomena are used to guide the luminous flux necessary for projection.X
X
HOW CAN RAYS DEVIATED BY A LENS CREATE A PICTURE? TO ANSWER THIS QUESTION, WE WILL ANALYZE HOW THE CAMERA OBSCURA CAN CREATE A PROJECTION AND FEATURES OF PICTURES TRANSPORTED BY LIGHT.
WHAT IS PROJECTION ?
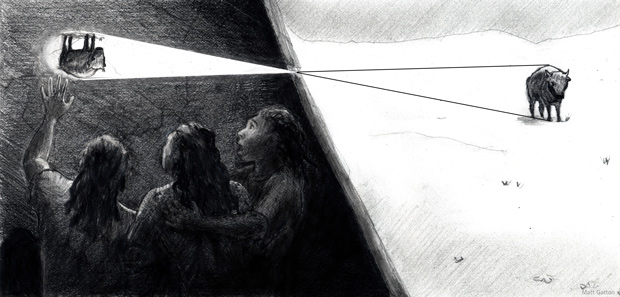
The projection is a natural optical phenomenon that transforms an illuminated object into a luminous figure on another object.
Illustration of a natural projection
There are 3 conditions for the phenomenon to occur :- – A bright object
- – A convergence point of rays reflected by an object
- – A second less illuminated object, acting like a screen
X
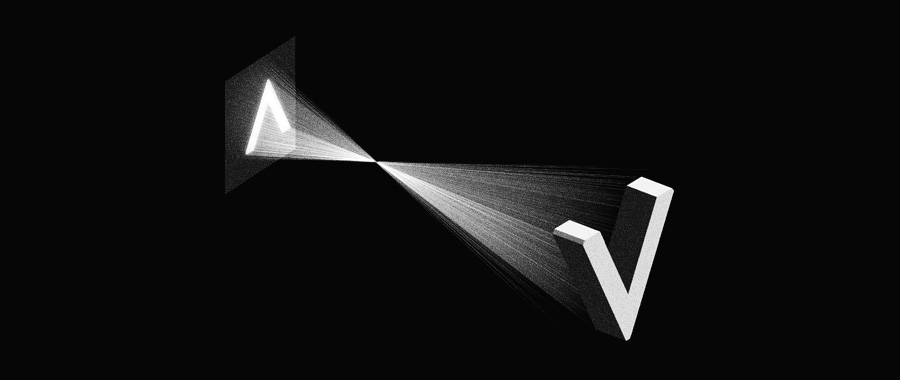
Projected picture of a cube on a plane by converging rays.
X
CAMERA OBSCURA
To realize this phenomenon, there is a very simple technical device that implements the conditions capable of creating projected pictures. Known since ancient times and described by Aristote, the camera obscura is a closed box, sealed from daylight, and that has a hole on one of its sides. The hole selects rays directed towards it, and in a straight line trajectory stops on the internal face opposite to the hole. The camera hole is like a ray selector and a projected pictures can form naturally inside the box.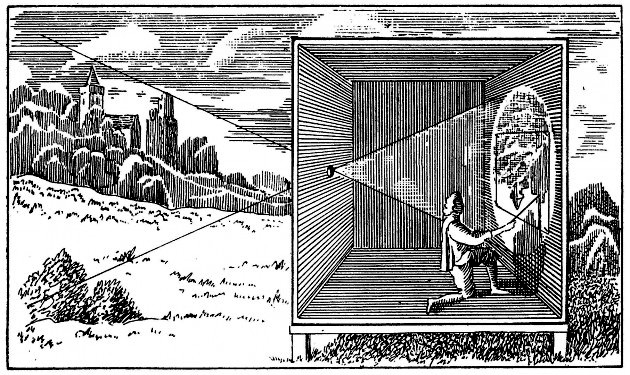
Camera obscura human scale
By restricting the entrance of the light in a point, each point of the screen is illuminated only with a ray from a point of the object. A bright and reverse picture of the object is achieved naturally, point to point, ray by ray. The characteristics of this transformation of the object to the picture depends on the position of the camera hole, which is the convergence point in space. In the fifteenth century, supported by the wish of the Renaissance painters to represent reality as our vision does, the camera obscura is a privileged instrument for drawing. Its size is reduced and then using a converging lens instead of the small initial opening. As lens is wider than hole, it creates brighter pictures, facilitating drawings.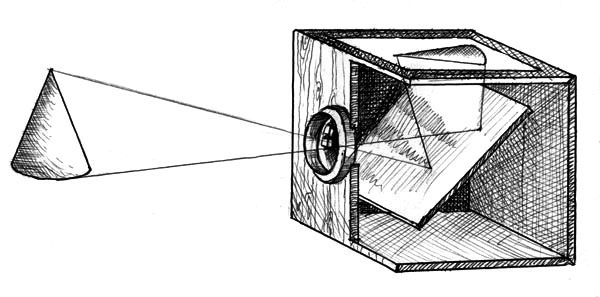
Drawing from a camera obscura
FROM CONVERGENCE TO PICTURE
If we can understand how, by drawing, point by point, a picture can be formed in the camera obscura, it is less clear that to understand how a lens generates a projection. For the projection to happen, there must be a convergence of rays; lenses also allow a convergence point in the middle, the optical center. Rays passing through the optical center don't deviate. They continue their trajectory in the same direction then upon arriving in the lens without changing their angle. The optical center functions as the hole in the camera obscura. But happens to all the other rays passing through the lens surface by another point ? As for the construction of the picture in the camera obscura, it can be constructed point by point from two basic optical principles :- – A ray arriving parallel to the optical axis converges on the focus of the lens (the same principle of the converging lens)
- – A ray passing through the optical center is not deflected (principle explained above).
X
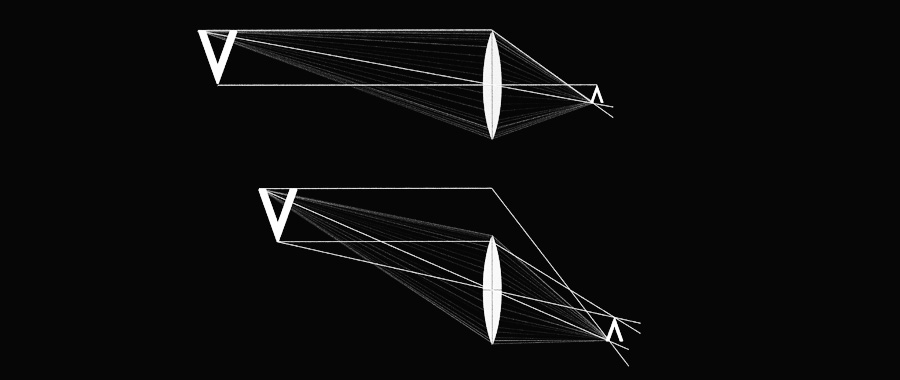
Construction of a projected picture (right) of an object (left) by a convergent lens
X
To determine where to form a picture relatively to a point of the object, it is necessary to draw the line of two emitted rays of which we know the behavior. One passing through the optical center and one perpendicular to the optical axis.
The first one passing through the optical center continues its path without any deviation. The second, parallel to the optical center, is refracted. The picture of the point of the object from which the rays originate is at the intersection of these two rays. Each point of the pictures "V" can be determined by these principles of construction. Each point of the picture comes from a multitude of rays crossed through the lens, which increases the brightness over a simple little hole. We also note that, unlike the camera obscura, where the picture appears sharp wherever the screen is placed, the picture appears sharp at a distance determined by the distance of the object to the lens. The closer the object to the lens, the wider and distant the projection.
On the other hand, properties of rays of light are identical whatever the propagation direction is (reverse return principle), the use of a convergent lens is reversible. The two curved surfaces of a lens project a picture in one way or another. Its use is only determined by the direction of the stronger flux. The drawing above, originally read from left to right with a flux comming from left also shows the projection of the object "V" to the right.

Projection of the sun
Another example : a parabolic mirror is made from a piece of reflecting parabola; one of its specificities is a center where every ray emitted is reflected in the same direction. It creates a parrallel flux from a divergent flux. This optical property is interesting to make projection devices which need a parrallel flux.FROM PICTURE TO PERSPECTIVE
What are the specificities of pictures generated by projection ? Pictures made by projection are bright in nature, reversed and perspectival. Bright because transported by a luminous flux, reversed because they are constructed geometrically from the central projection which reverses picture of the object and the object. And, perspectival because they draw different shapes depending on the properties of the perspectival representation.What is perspective? Perspective (of pierspicere Latin: see through) is a mode of representation of space on a plan that requires a fixed point of view determining how dimensions in space change, whether one sticks to the same point of view or changes position.
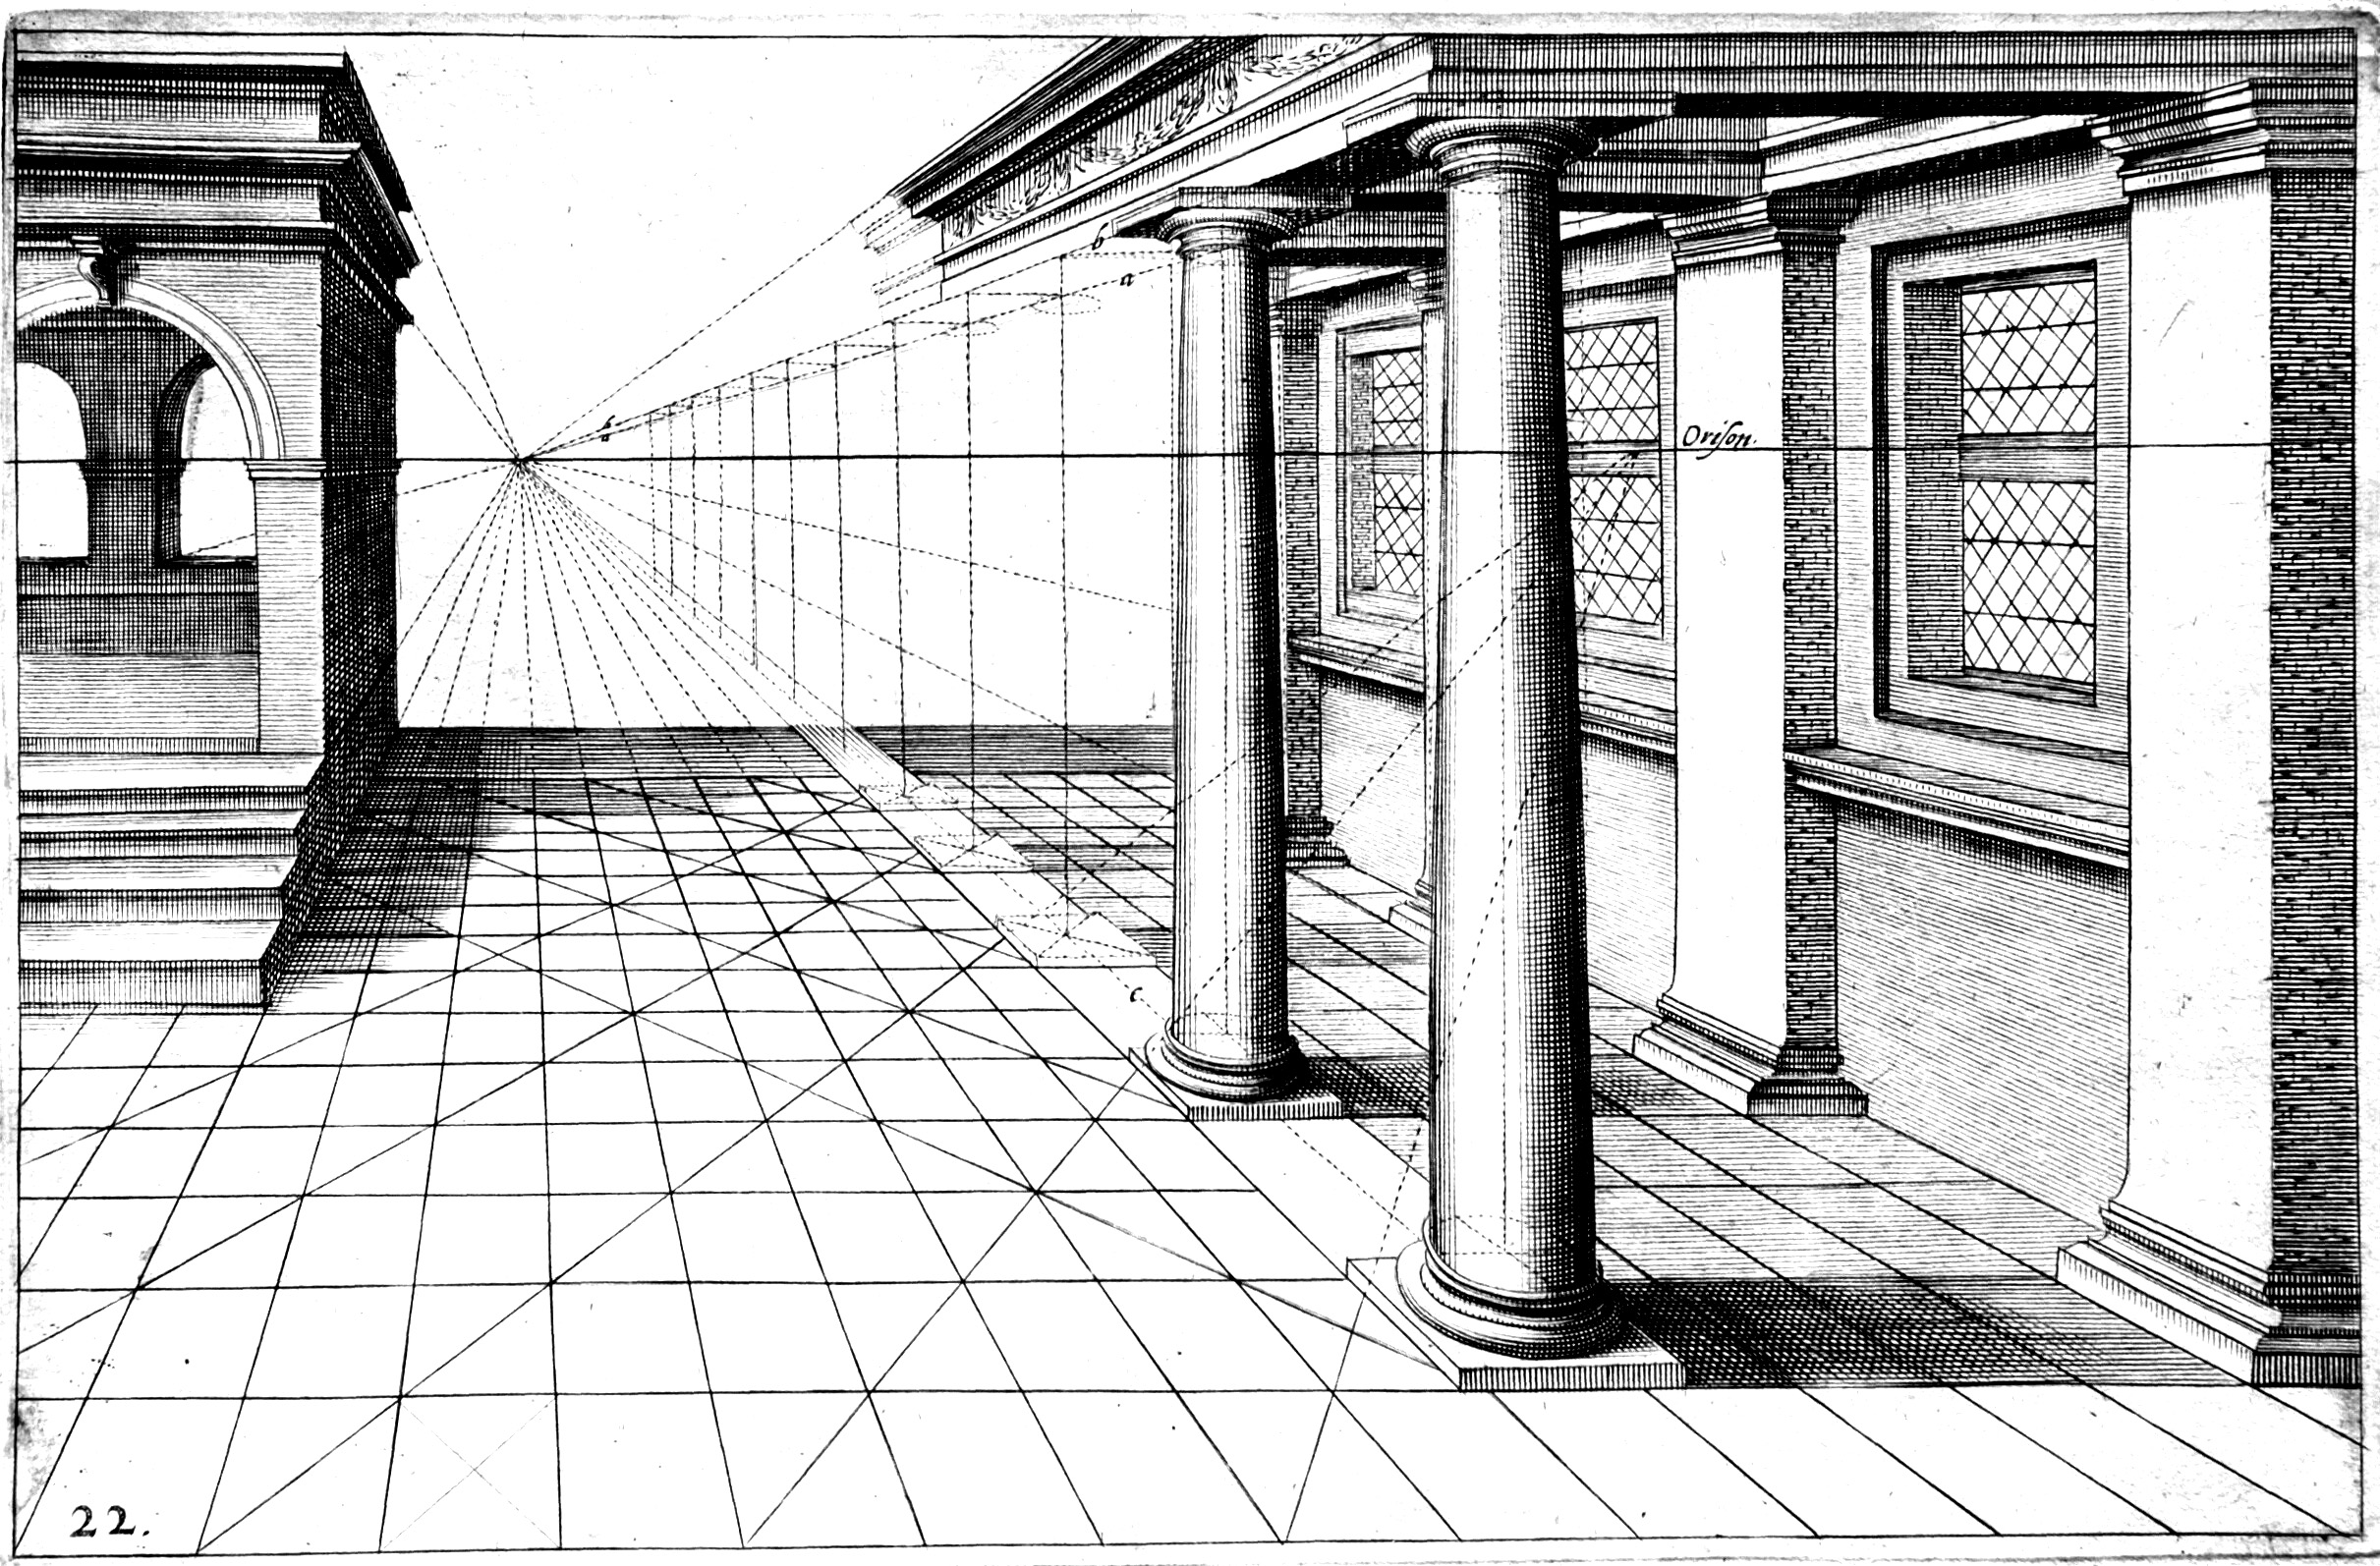
Construction of a perspectival drawing from a vanishing point
Perspectival pictures are the result of a loss of dimension, a 3-dimensional space to a bi-dimensional picture, drawn by projection. The lost dimension, the depth, determined by the optical axis of the lens, deforms the other two dimensions. So, the further away the object is from the point of view, the smaller its scale in the picture. The structure of the picture from vanishing points and skyline. For a simple understanding, it will not matter here to explain how we can recreate perspective drawings. But just be aware that it is a particular mode of representation of space on a plain surface and it's one that operates in the projected pictures.
Illustration of a projection of a perspectival and reverse picture on the retinal background
FROM PERSPECTIVE TO VISION
Human vision also works from projection. Our eye is a lens that projects a picture on the retina of the space before our eyes, like a camera obscura.
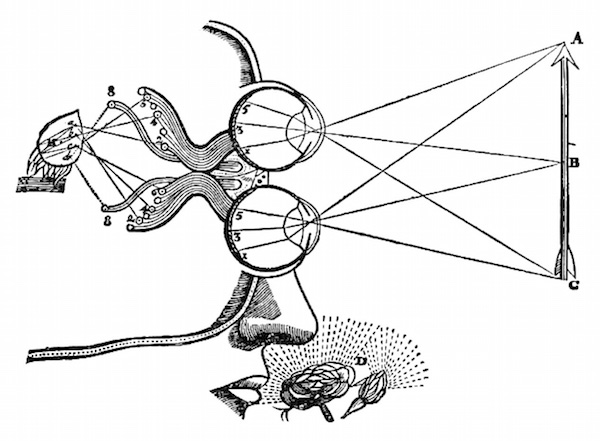
Illustration of a projection on the retina background by Kepler
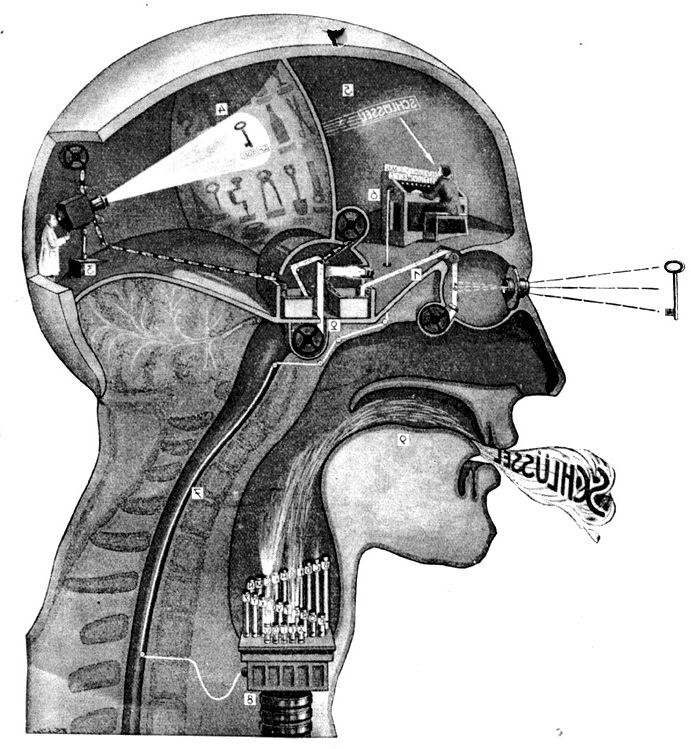
It is from these pictures illuminating the back of our eyes that we represent the depth of space. Visible reality is reconstructed by our mind in front of our eyes while it is projected inside our optic system, made of perspectival pictures. Our mind works like an inverted projector that transforms the projected pictures of the background of the eye into an object in front of us. From the projected picture at the back of our eye and our physical presence that allows us to certify by contact the real existence of the object, our mind achieves its projected and understandable picture of the object. Our consciousness of the visible world seems like a reverse projection that transforms pictures into objects.
Illustration by Fritz Kahn
THE PERSPECTIVIST PICTURE
Because they are structured as pictures projected on our retina, perspectival pictures allow the illusion of space. When we look at a photograph, the picture in two dimensions is projected upside down on the retina. Like any projected pictures on the retina, our mind does its job of inverting that image, like a projector. Our mind carries an object from the perspectival picture on the retina, whatever its nature or origin : the result of a projection of the space physically before us or a photography. Thus, objects in photography seem like real objects our mind.
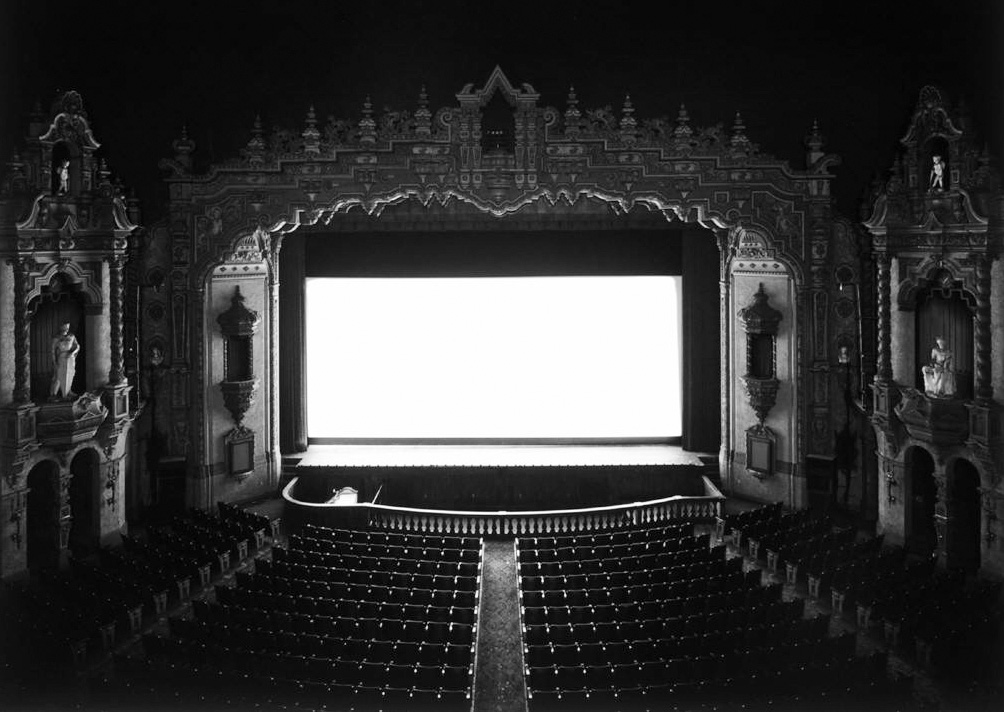
Theatres, Hiroshi Sugimoto
Cinematographic projections show, in the darkness, a giant perspectivist picture; it truly challenges this mental projection. Beyond the illusion of reality which we originally play with, there is the projection of our emotions regarding the narrative of the film. All perspectival pictures show to us, especially those from a projection device, or drawings imitating 3D, create this illusion of reality. Projection, at the center of this, optically converts the picture into objects as the spirit convert pictures into objects.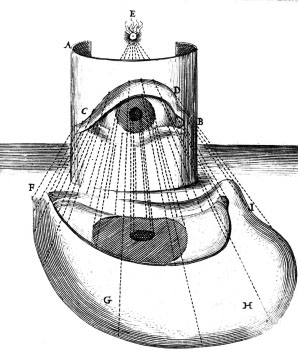
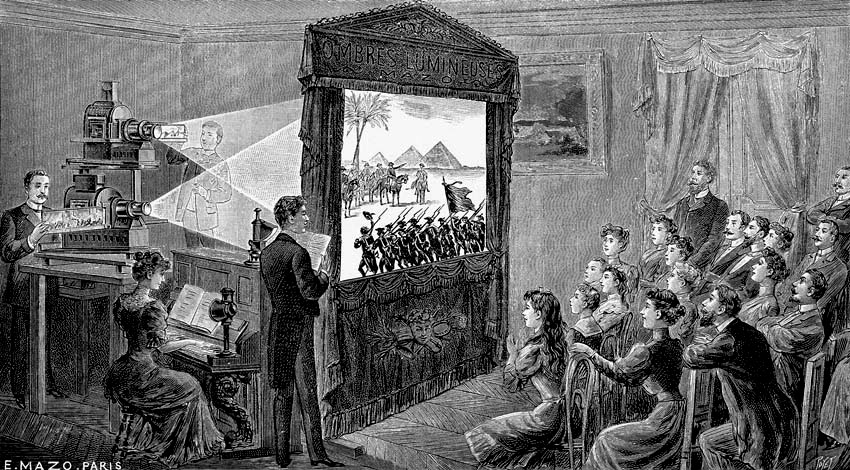
Illustration of Bettini
X
X
HOW TO BUILD A PROJECTOR ? BY APPLYING THE FUNDAMENTAL PRINCIPLE OF REVERSE BACK LIGHT, ONE WILL DISCOVER DIFFERENT DESIGNS ALL BASED ON THIS PRINCIPLE.
REVERSE LIGHT
The eye, the camera obscura and the camera receive light and display a picture from a bright external flow that reaches the inside surface and system. They work with the light that reaches them; we can compare them to secondary light sources. Now, with the principle of reversibility of light, a lens has a focal point on each side. Thus, we can send a beam from either sides, it will still project a picture on the opposite side. In practice, the direction of projection is determined by the direction of the largest light output. In a camera obscura, an eye, or a camera, the main light flow comes from outside, that is why we can group a camera, a camera obscura and a human eye as receivers-projectors. But if we reverse the direction of the light and we strongly illuminate an object in the camera obscura, it will project its picture on the outside and will appear only when the stream meets a less illuminated object a front of the camera.
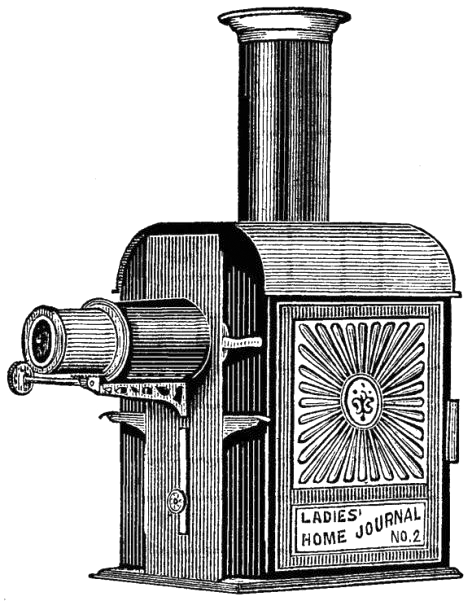
Magic lantern
To transform a projector that receives light, like a camera, into a projector that emits light, like a videoprojector, you need to change the position of the light. Light is coming from outside, in the case of a camera, whereas light is emitted from the inside in the case of projectors. Both of them have a lens that transforms an illuminated object into a projection, it’s only the direction of light that decides the way it works. A camera can easily be transformed into a projector by inversing the direction of the light and placing a positive transparent picture instead of a photographic film. The first cinema projector used to work as both a camera and a projector, and some photographic cameras could also be used as enlargers for laboratories by adjusting a backlight behind it.
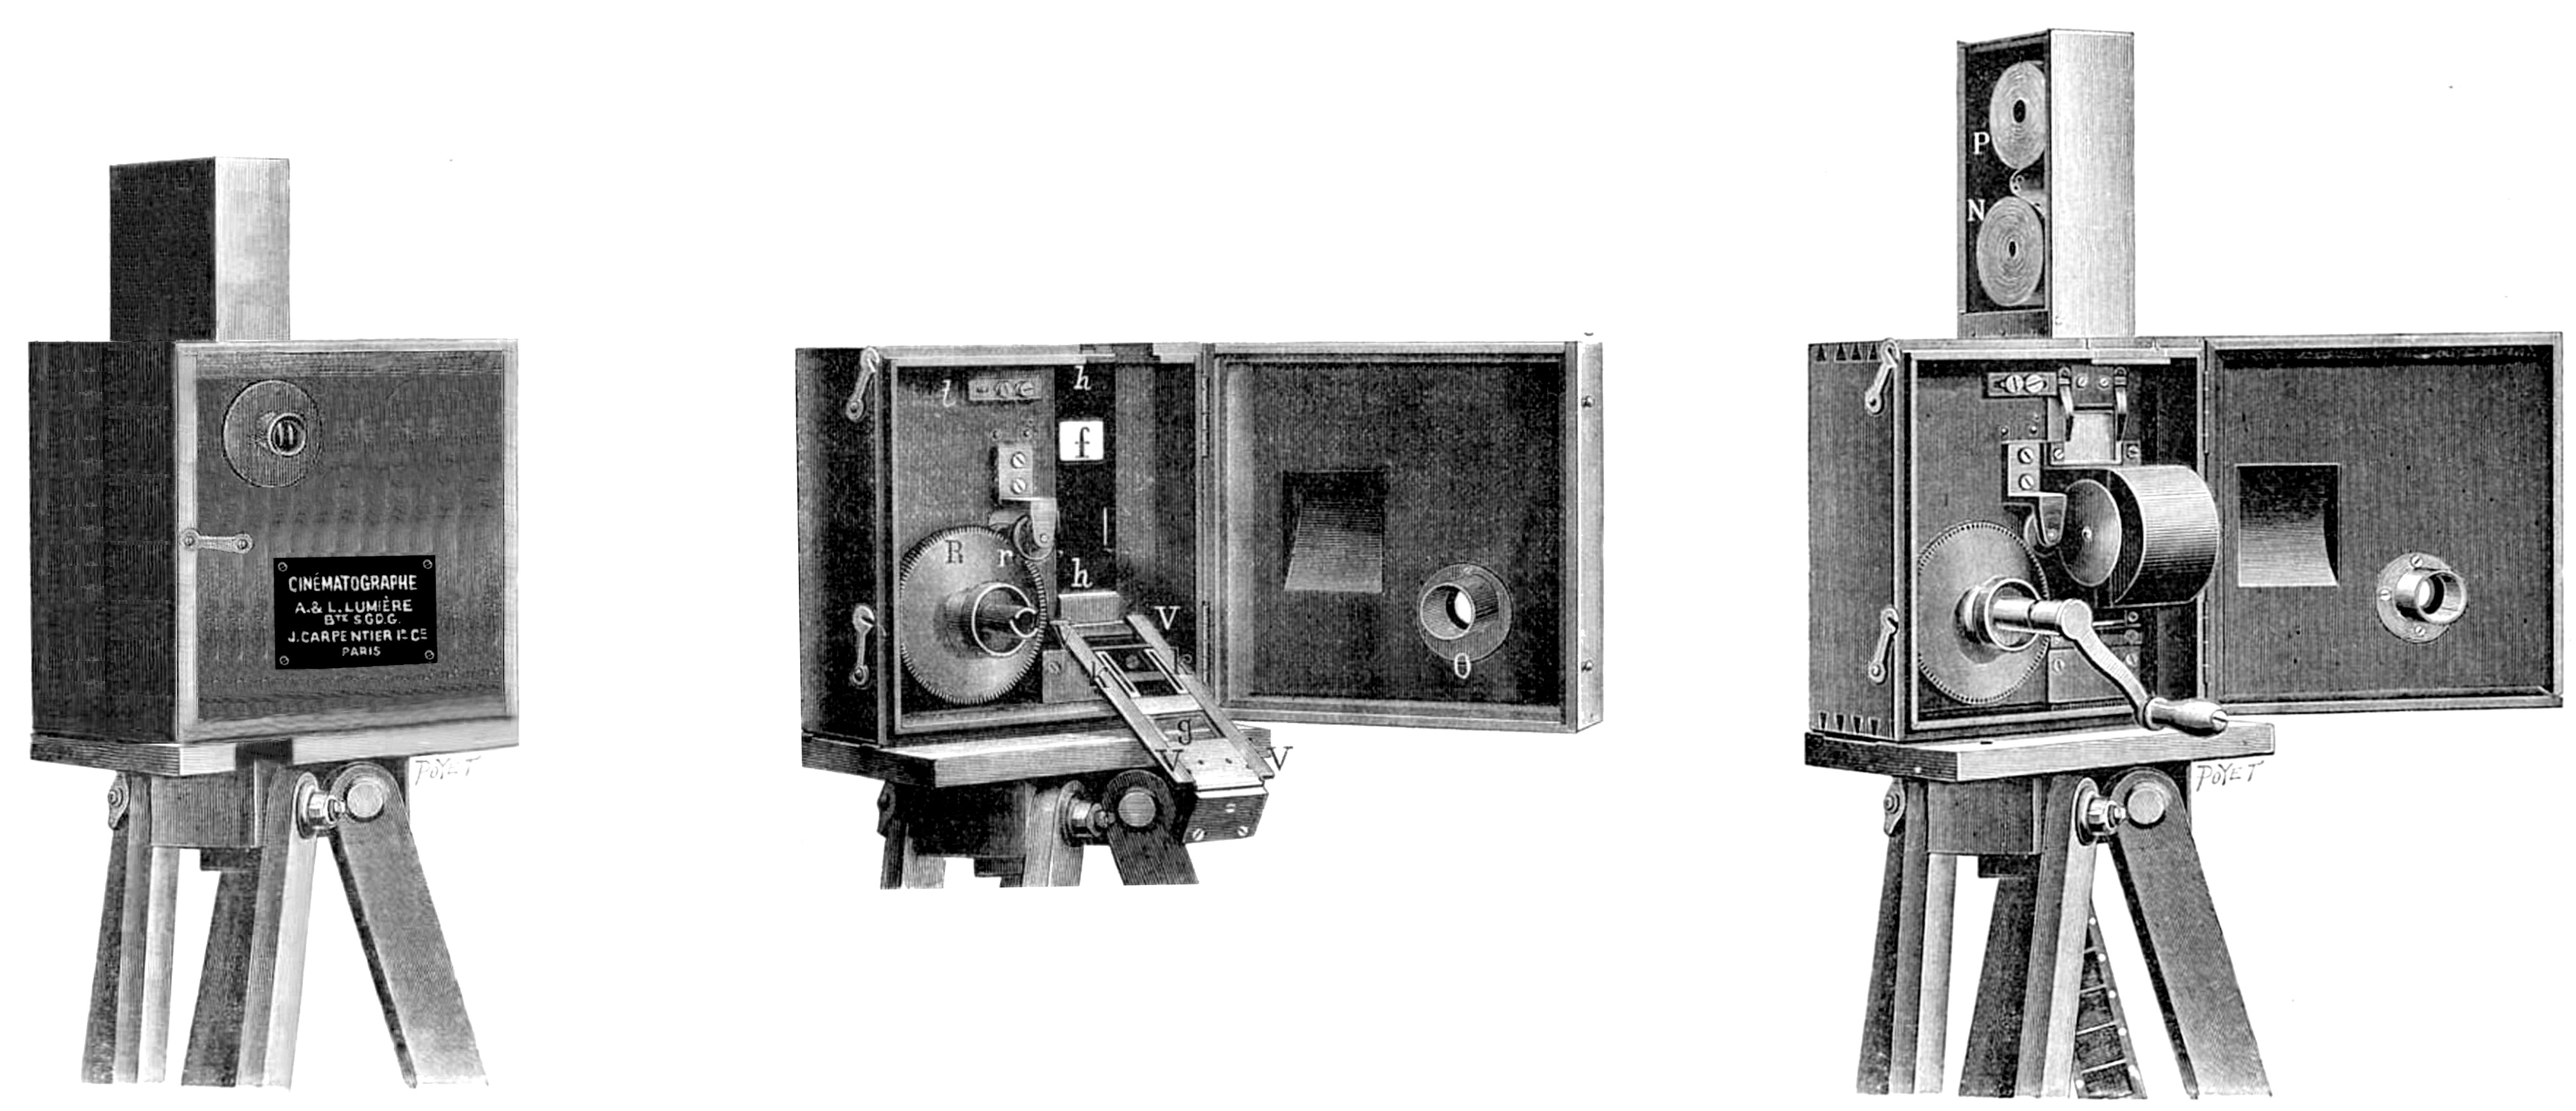
Cinématographe Lumière
In light of this knowledge, it became possible to manufacture one's own projection devices. The following sections describe the components of projectors, from the light source to the projection lens.The projector
A projector is a device that allows conditions for projection and produces a projected picture. To make projection happen, it is necessary for the light source of the projector to be brighter than the ambient light. The brighter the picture, the easier it will be visible, regardless of the ambient light conditions. The aim in the design of a projector is therefore to optimize its efficiency in order to properly use the greater part of the light flux emitted by the source. The design of a projector is therefore to organize the flux emitted by the lamp, which passes through the pictures and converges at the projection lens. The design uses several types of mirrors and lenses whose behaviors have been described in the first part of this section. The projectors operate from the alignment of the various optical systems that concentrate the flux emitted by the source to the projection lens while passing through a transparent picture.
Magic lantern
EXAMPLE OF DESIGN
We can distinguish four basic parts that are found in the design of all the projectors, which in the direction of light are :- 1- A light source, emitting a beam of light.
- 2- A focusing system focusing the light emitted into the projection lens.
- 3- A transparent picture, through which the light is output.
- 4- A projection lens, which operates on the projection picture in transmitted light.
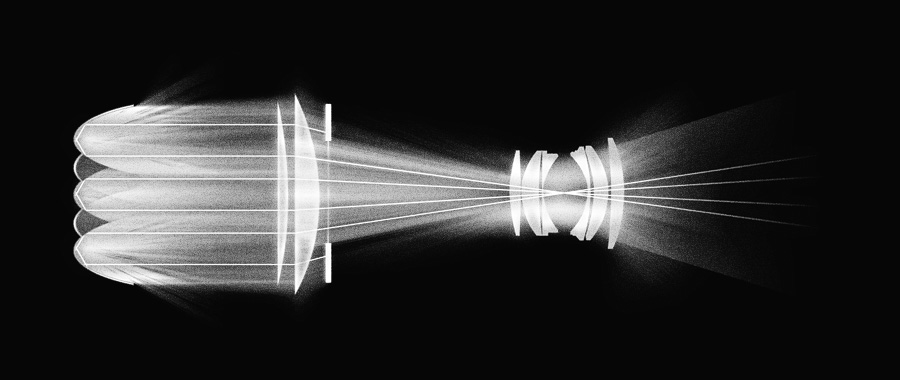
Example 1: the slide projector
X
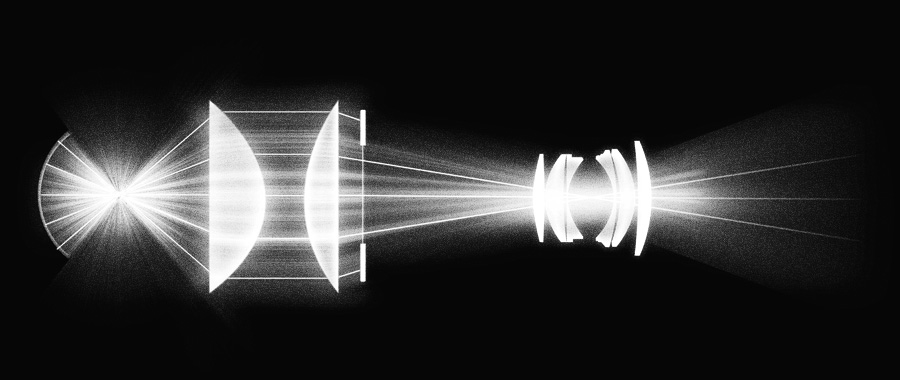
Spherical mirror and double condenser.
X
1. Light emission: On the left, a light source is located at the focus point of a spherical mirror on one side, and at the focal point on the other side of a convex lens. Emitted rays on left are redirected to the source and add to the already present rays directed toward the lens. Rays emitted below and above are scattered outside the system, making them useless for projection. About a third of the rays emitted by the lamp fail to properly back in the optical system of the projector.
2. Convergence objective: a light source is located at the focal point of the convex lens, the lens converges the beam into a parallel beam that reaches a second lens. Then, it converges the beam to the center of the projection lens. This way, all the beams that have reached the first lens can converge toward the projection lens.
3. Positioning the transparent pictures : a transparent picture is placed on the beam of light between the second lens and the projection lens. Its position is determined relatively to the focal distance of the lens.
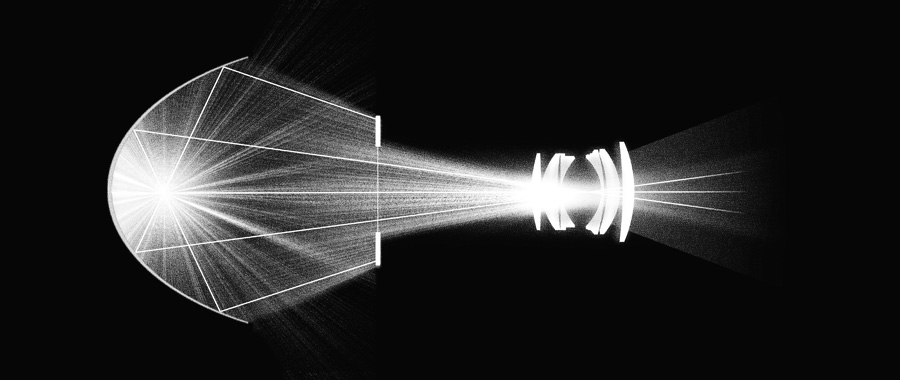
Example 2 : mirror projector and single lens
X
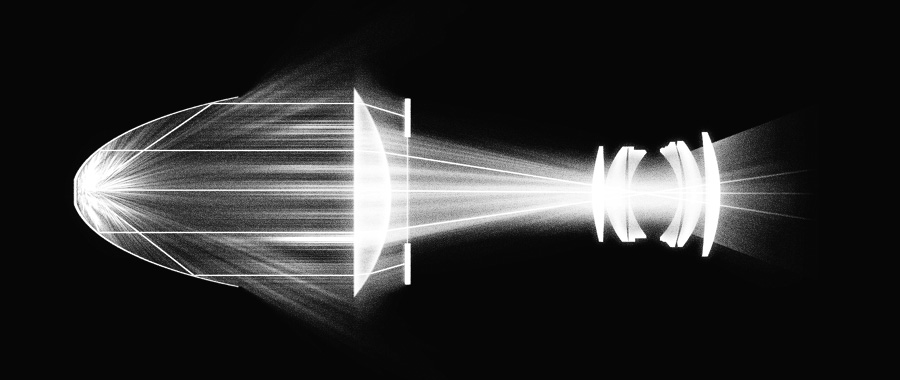
Parabolic mirror projector and single condenser
X
1. Light emission : the source is located at the focus point of a parabolic mirror, the reflected rays generate a parallel beam. Non-reflected rays are scattered outside the system, they are not useful either for projection.
2. Convergence : a converging lens focuses the beam in the center of the projection lens.
3. Transparent pictures : A seamless picture is placed on the beam of light between the second lens and the first lens.
Example 3: the Visio
X
Visio projector
X
This follows the preceding principle, except that several light sources, each associated with a parabolic mirror, are arranged together. Rays reflected by the mirrors generate a parallel beam then converged in the center of the projection lens by a pair of convex lenses.
Example 4: single mirror lantern.
X
Elliptical mirror projector
X
1- Light emission : The light source is placed at the focus point of an elliptical mirror. Elliptical mirrors have two focus points, rays from a source placed in one focus point converge at the other focus point.
2- Convergence : A projection lens is located at the second focus point to receive all the reflected rays.
3- Transparent picture : The picture is placed on the axis of the mirror at the focal distance of the projection lens.
These examples are intended to show you the variety of methods used to design projectors. Other systems exist, but all meet these conditions: converging a light flux that has passed through a picture and onto a chosen surface.
Conclusion
Projection is a natural optical phenomenon that plays a fundamental role in how we perceive the visible world. For making projection, you need a point of convergence for the rays of light. Convergence creates a picture on the opposite side of the illuminated object. These images formed by projection are structured by the perspective. Perspective allows us to perceive within the picture a 3D representation, to see a real object in the picture. Our eye transforms the picture into a mental projection, the pictures is apprehended by our mind as an object. Projection devices such as cameras work identically to our eyes. But it is possible to convert cameras into projectors by reversing the direction of light. A camera can become a tool capable of projecting a picture. If photography can be considered as a mechanical eye, projection can be compared to consciousness, which materializes reality from pictures. Questioning projection is not limited to a technical approach, it calls to be searched further into by developing a reflection on these specificities and its possible uses.X
X
Use of a projector obeys to simple optical and geometrical principles. By choosing the most appropriate lens, the point of view and the best conditions, you'll be able to use the full potential of your device.
X
X
APERTURE PRIORITY
In projection as in photography, the optical specificities of the lens remain unchanged. The more opened and bright the lens, the brighter the projection. For example, a projection made with a lens opened to 2.8 is two times brighter than F:4. It is strongly recommended to use lenses of the greatest aperture possible in order to enjoy the highest possible brightness. Fixed focal lens lengths are particularly suitable because they offer larger openings while remaining lighter and less expensive, for example : a 50mm F / 1.8.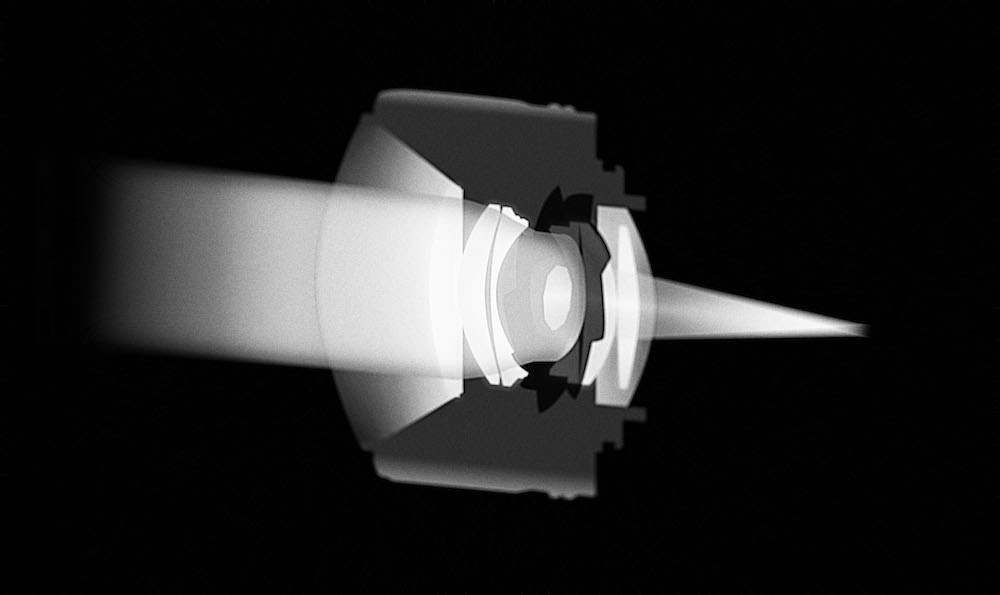
Sectional view of the diaphragm of a lens reducing the flow of light
FOCAL, A QUESTION OF DISTANCE
As in photography, focal length determines the angle of view and depth of field. The longer the focal length, the shorter the depth of field.
Longer focal length and decrease the angle of view
In photography, the choice of the focal is often determined in relation to the distance between the camera and the subject. The same logic is used in projection, the focal length must be chosen according to the distance of the projectioner from the screen. If you are close, choose a normal or short focal length. If you are far away, choose a longer focal. You can project the same size of picture if you are far with a long focal length or close with a short focal lens.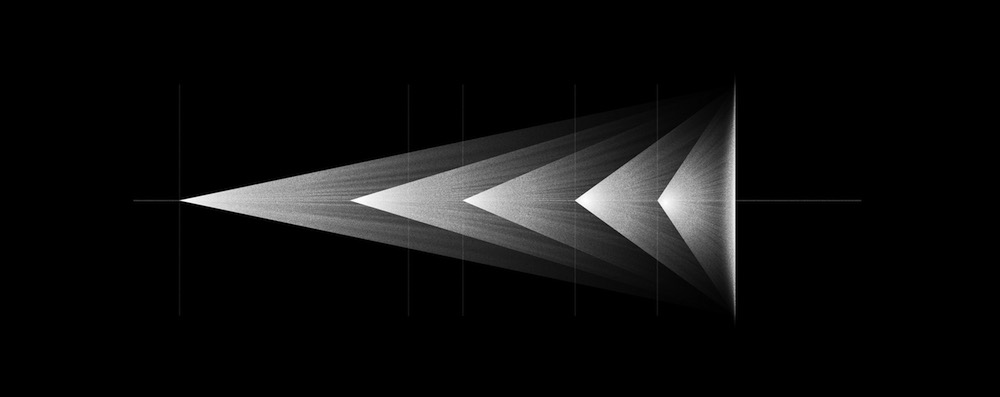
Projections of the same size, obtained at different distances offset by the focal
The choice of the focal is adapted to the projection conditions. In the table below, you will find the size of a projection paired with the chosen distance and focal length. By following the red line, one can see that the projection size remains constant by compensating the focal distance. For example, one can project a base image of 2.5m, 1m with a 28mm lens or 7m with a 200mm.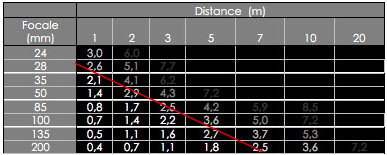
Distance / focal length
For long focal lenses, it may be profitable to use medium lenses using an adapter, a 67 Pentax 105mm F / 2.4, for example, or a Pentacon 150mm F / 2.8. If you want to use an extender, it is best to use a front converter of a large diameter placed in front of your lens rather than a rear converter. It reduces the opening and thus decreases performance.Focus
Visio requires the use of 35mm or medium format lens with a manual focus - since the focus ring must be adjusted manually. To obtain sharpness in your projection, simply turn the focus until you get a clear picture. Do not refer to the distance indications on the ring, which are now shifted forward. If you want to project at a very short distance, use a macro ring or intermediate rings between the ring holder and slide the mount to increase the mechanical draft. Recommendation: it is preferable to project as horizontally as possible. The more the projector is tilted, the more it causes a wedge-shaped distortion, and it also causes the apparition of blurred areas. For a projection on high surfaces, the tilting of the projector can be softened by moving further away from the surface and using a long focal lens. For a projection at eye level, it is recommended to place the device at breast height so as to project horizontally.
Inclination variation of the projector according to its distance.
Conclusion
For projection, one will prefer the use of fixed focal lengths because of their high openings, low weight and size, and their reasonable prices. A standard of 50mm lens F / 1.8 indoors and a 85 mm F / 1.8 outdoors is a great base. Second-hand 50mm lenses with a large aperture can be easily found at extremely attractive prices. For 85mm, the Vivitar or Kelda 85mm F: 1.8 is certainly the most accessible in new condition. For even longer lenses, the Pentax 67 105mm F / 2.4 or the Pentacon 150mm F / 2.8, second-hand, mounted on CANON mount adapter appear as the brightest and least expensive solutions.X
MAKE YOUR PROJECTIONS VISIBLE
X
WHAT DOES THE VISIBILITY OF PROJECTION DEPEND ON ?
Once the lens is mounted, you need to make your projection the most visible. For this, the light of the projection should be more important than ambient light. Only on this condition will your projections be completely visible. The brightness of the projection depends on the aperture of the lens. But the visibility of your projection depends on other parameters. These parameters are : the size of the picture, ambient light, the appearance of the projected surface, the appearance of the picture and the viewing distance. So here, in order of importance, recommendations relating to each of these parameters.BRIGHTNESS, A MATTER OF SIZE !
As a projectionist, here's what you need to keep in mind: the brightness of the projection depends on its size. You have to see the projection as a stream of light that we will more or less concentrate. A modest projection size is sometimes more favorable than one too large. Because when too large, it becomes luminous. For example, a 2x3m projection is 2x brighter than 3x4,5m and 4x brighter than 4x6m. In the last diagram, one can observe that the bigger the size, the darker the number, as to translate the decreasing of luminosity according to size. For a given aperture, one can easily deduce that the bigger the projection, the dimmer the brightness.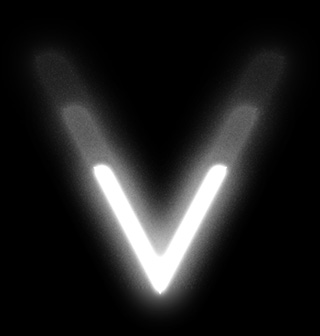
Brightness of a projection according to their size.
Ambient light
The ambient light is the first thing you need to be careful about !Projection fits the environmental conditions and rarely the contrary. If the ambient light is low, the projected picture does not need to have a high light output to be clearly visible. On the contrary, if the ambient light is high, it will take a strong light output to get a good projection. As you are limited by the power of your projector, the maximum size of your projections is limited by the ambient light. This makes ambient light a factor just as important as the power of your projector. It is therefore important to limit the ambient light to highlight a projection, to preffer darker places ! With a little practice, you will determine just by looking at the light around you the right size for a projected picture that you can consider with your Visio. In darkness, a visible projection can go up to 10m width, while under high ambient light it will not likely exceed 1m. The approach of mobile projection is to deal with the light conditions to obtain the best visibility. The Visio give you all the mobility necessary to project in the best possible way.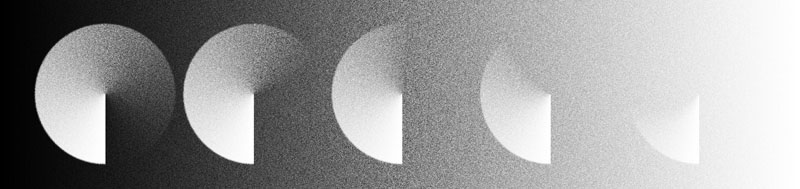
Appareance of a B&W projection on a more or less bright background
In the illustration above, each circle represents all the shades of light available in a projected picture on a background that goes from dark to light. We can observe how the dark values of the projection are supplanted by the brightness of the background. This erases dark areas and gradually lowers the contrast of the picture. One can conclude that the darker the viewing conditions, the neater the perception of the projection.Projected surface aspect
To appear, the picture needs a screen, a surface, a medium. For starters, it should be opaque and not transparent in order to reflect light. Windows or the surface of the water - due to their transparency - will not show your projections. Otherwise, everything is a potential screen ! Walls, trees, stones, bodies, clothes... The world is a screen on which to project your pictures. Clear media reflect better light on your images than dark ones. It therefore also affects the maximum size of your projection. Nevertheless, a totally black surface may be used for projections of small size. Secondly, the support being a volume, it is more or less transforms your picture. If it is a flat wall, transformation and distortion will be nonexistent. But if you project on different objects or "confused screens", such as the leaves of trees, the image will be transformed, distorted, making it difficult to understand. In conclusion, all images can be projected on a flat screen surface but only easily understandable images can be projected on particular screens.
Initial image / image distorted by a support with asperities.
Image aspect
Brightness, contrast, and color matter a lot in perception. To make a clear projection, the image must be clear as well. A bright and contrasted picture will result in a projection with the same characteristics. Thus, black and white images are the most effective sources since they have a high contrast with completely transparent white areas, unlike color images that are more nuanced.
Result of the reduction of contrast for a projected image
One can observe in this illustration how the same image with a different contrast appears more or less clearly.VIEWING CONDITIONS
Installing a picture in space means to consider how it will be perceived. If you want to make your projection visible, you must make the viewing conditions easy. The viewing distance makes the size occupied by the picture vary in the observing field of the public. A picture projected too high or too far away will be hard to make out correctly, while a picture close to the eye level will be more visible. We must think about the visibility of your image in space. Again, the mobility of the Visio will allow all possible experiments, so enjoy ! 6 tips to make your projections clearly visible : Lens aperture : As open as possible ! Size : A reasonable size for a bright projection. Ambient light : Prefer the dark side ! Screen aspect : If projecting on a complicated surface, choose an easily readable image. Image appearance : Clear and contrasted ! Viewing conditions : Make your projections easy to see !Conclusion
Projecting means to cope with the picture and space. Visio's strong point is its mobility; it will give you the freedom to test, observe, understand and learn projection with unprecedented ease. Carry it around with you with some pictures and take it out when given the opportunity. If you wish to have a greater impact in space, consider multiple projection : several pictures projected with multiple projectors will reconfigure the space and offer a wider variation of proposals rather than a single large image. Finally, take pictures of your projection to show them, share them ! A real camera is preferable to a Smartphone, rather insensitive to light, and a good tripod will be a very useful accessory.X